Thinking about an in-person or online workshop next year? Maybe a bit of travel? Contact me or follow the links for information and registration. And check the workshop tabs at Drawing Perspectives for updates. Thank you!
LIVE ONLINE on Zoom: Understanding Perspective + Lots More! | Three, 4-hour classes that finally demystify perspective and watercolor sketching. These classes are packed with information, you’ll learn tons. More classes will be added in the Spring.
January 5, 12, 19, 2025 at 9am PST | Only 2 spots left! Email me for info at stephaniebower.workshops@gmail.com
____________________
LIVE ONLINE: Terracotta Explorer: Perspective in Spain, Towers are Like Wedding Cakes | This is part of an ongoing series of classes through Terracotta, whose cadre of artists are among the best in the world. A few can join specifically for my one class on sketching towers.
LIVE ONLINE: Terracotta Symposium: The Foundations of Architectural Art | This event is not to be missed! Join four instructors who specialize in sketching and painting architecture–the rockstar Thomas Schaller, Alex Hillkurtz, Pablo Questa, and me (Stephanie Bower! ) — and immerse yourself for a weekend in the world of architectural beauty as each artist leads an in-depth session with live demonstrations and an interactive Q&A. Lifetime access to recordings. My workshop will be on sketching this view of Turl Street in Oxford.
Use code BOWER50 to get a whopping $50 off the early bird price!
____________________
LIVE IN-PERSON | Urban Sketching in Quebec City, Canada | You’ll think you are in old world Europe, but it’s Canada! Join me and Studio 56 for 6 nights, 5 days of instruction as you learn how to sketch streets, fountains, elegant towers, and more…lessons in the morning, cultural visits and sketching in the afternoons. Register now for early bird pricing.
LIVE IN-PERSON: Northern California Coast at Pacific Grove | Imagine 5 days of sketching this beautiful coast, old churches and missions, and more for a combination of in studio and outdoor urban sketching. Sponsored by MISA in their beautiful new workshop location.
I’m squeezing in a workshop before the end of the year!
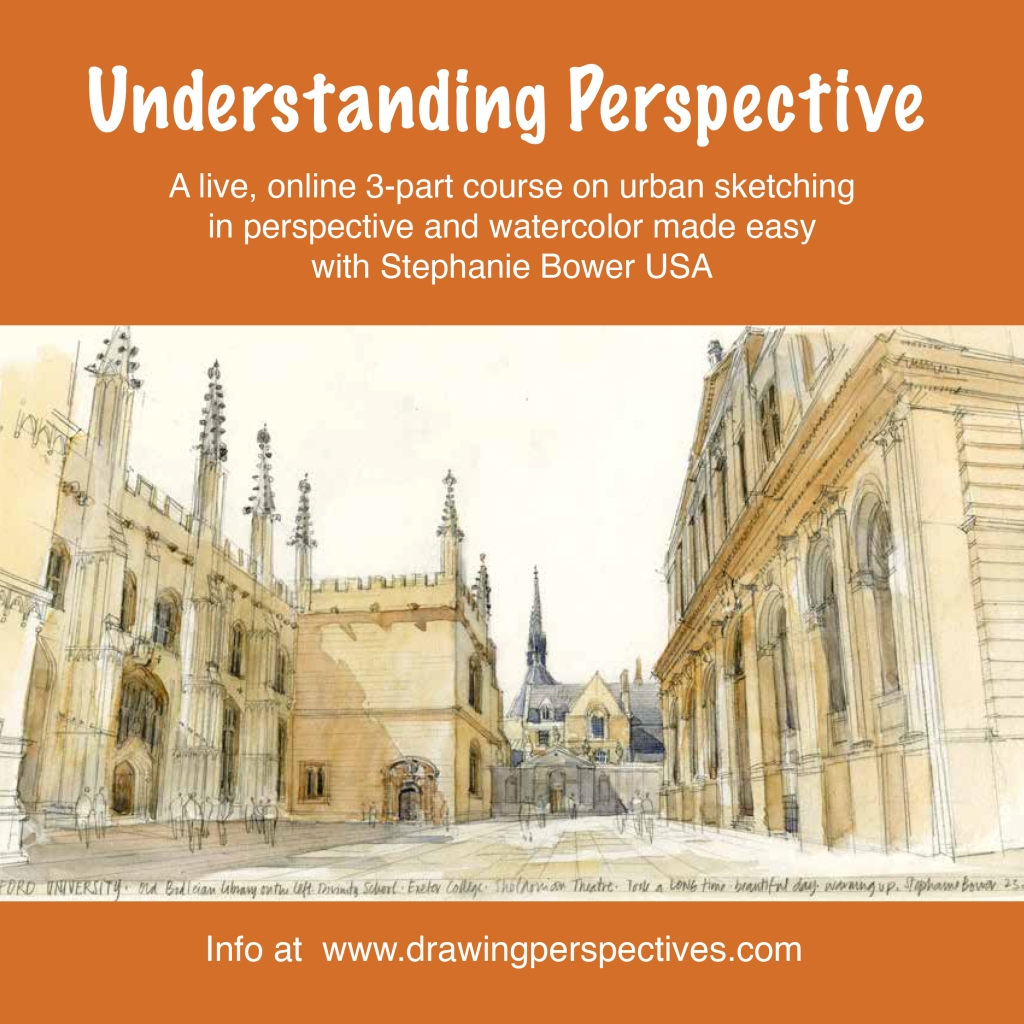
UNDERSTANDING PERSPECTIVE | LIVE online Urban Sketching Course in Perspective & Watercolor, made easy with instructor Stephanie Bower USA
Do you fear or fake perspective sketching? Can’t figure out how to start a sketch of a building? And where is that darn vanishing point anyway? Do you know how to paint shade and shadow differently? They are not the same!
Understanding Perspective is a LIVE online course that makes perspective sketching easy! I’m Urban Sketcher, workshop instructor (I’ve taught at 7 USk international symposiums!), architectural illustrator, and author of three books Stephanie Bower, and I’m excited to offer this course to anyone wanting to finally understand how perspective works. Perspective is easy when you know what to look for!
This course is a 100% live, interactive 3-part online class taught via Zoom in which you’ll learn by drawing along with me in real time. In each class, we’ll take notes and sketch together as I present perspective concepts in a crafted PowerPoint presentation, then we will apply those concepts in a step-by-step sketching demo that we will draw and paint together.
What makes this course different from others? Two things: We diagram the perspective views, explaining why the views look the way they do, SHOWING how perspective works. Most instructors skip this part! And second: it’s really two workshops in one. You’ll learn perspective AND watercolor technique! You’ll see me work up close (even better than an in-person workshop), and I’ll answer your questions LIVE.
Understanding Perspective, December Session 1
Dates:Sundays, December 8, 15, and 22, 2024 | 9am-1pm PST (Seattle) | 12noon-4pm (NYC) | 5pm-9pm (London) | 6pm-10pm (Paris)
Class 1, Sunday, December 8: The essentials of one-point perspective. Intro to Watercolor.
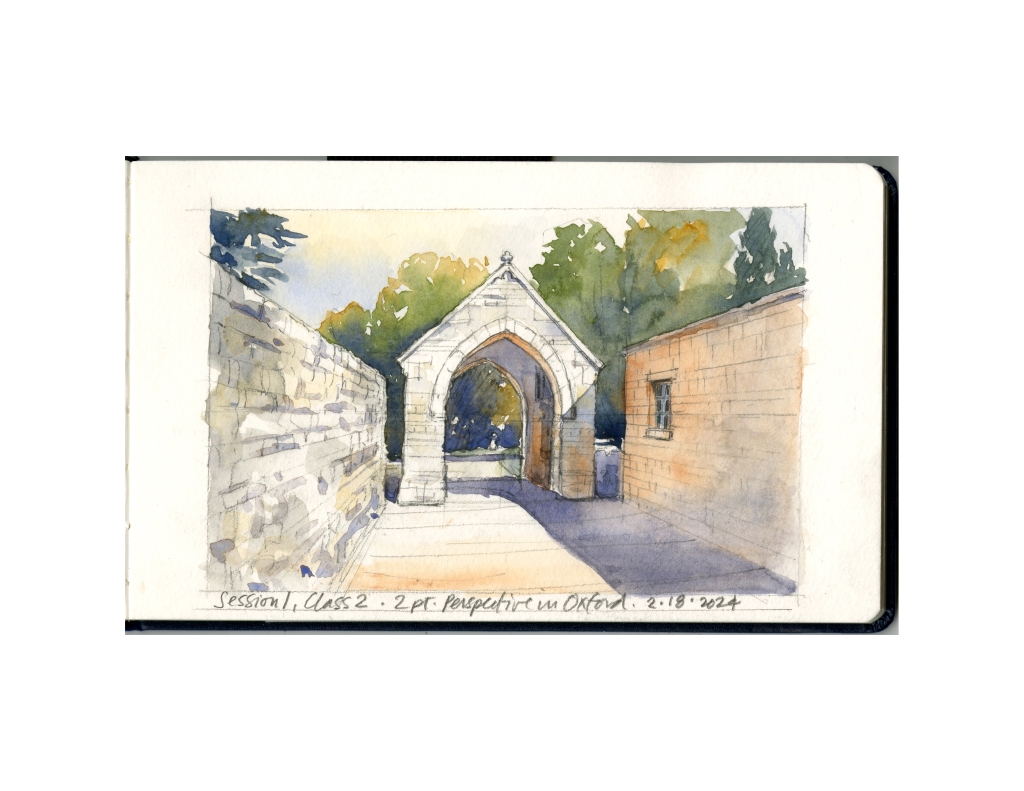
Class 2, Sunday, December 15: Two-point Perspective, it’s all about how you view your subject!
Class 3, Sunday, December 22: Multiple vanishing points in streets, roofs, and stairs.
Each class will start with an interactive PowerPoint on the topic of that day (you’ll be encouraged to take notes, ask questions, etc.), followed by a demo that we draw and paint together step-by-step. Classes run about 3.5-4 hours (it goes quickly!) Classes will be recorded, and you’ll have access to the recordings through the end of January.
Optional Homework: Along with notes and scans of the demo, I’ll send out 2-3 images after each class for optional homework. If you draw and paint them, you can send them to me for a critique.
Workshop Fee:US$300.00. Classes will be limited in size to max. 20 so you can all get live feedback. Once your registration has been confirmed, information on how to pay, a materials list and more will be emailed to all participants.
How to Sign Up: Registration is open NOW! Send an email to st.bower@icloud.com. First come, first served!
After this workshop, you’ll never fear or fake perspective again! If you have any questions, or need more info, send an email my way. THANKS!
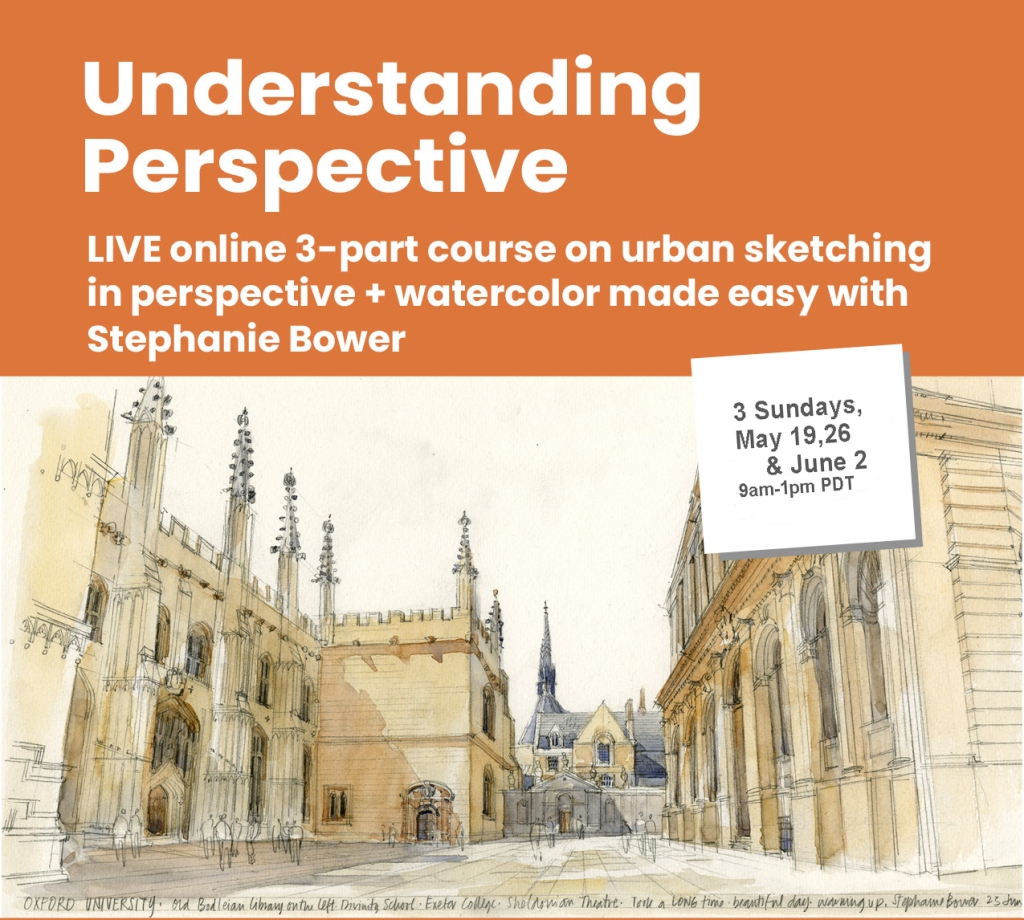
Want to jump-start your summer sketching? I’m squeezing in another perspective sketching workshop before summer officially hits. Three classes, three Sundays, three kinds of perspective views…and lots of watercolor technique too! Where else will someone diagram for you how perspective works and WHY it works the way it does?! Like I always say, perspective is easy when you know what to look for.
What are these workshops like? This course is a 100% live, interactive 3-part online class taught via Zoom in which you’ll learn by drawing along with me in real time in a small group. Rather like a college class, we’ll take notes and sketch together as I present perspective concepts in a crafted PowerPoint presentation, then we will apply those concepts in a step-by-step sketching demo that we will draw and paint together. Yes, you’ll learn lots about watercolor technique too–it’s really two workshops in one…perspective AND watercolor!! You’ll see me work up close (even better than an in-person workshop), and I’ll answer your questions LIVE. They are geared for any artist or sketcher at any level. OK, some people actually tell me that they are the best classes they have ever taken!!!
Sunday, May 19: Class 1: The Essentials of One-Point Perspective: Creating a Sketching Road Map to Follow Concepts of Perspective, developing the “good bones” of a perspective sketch in 3 simple steps AND Intro to Watercolor using a limited palette
Sunday, May 26: Class 2: Two-Point Perspective: It’s All About How You Sit! View Angles and View Eye Levels, One & two-point perspectives—what’s the difference?
Sunday, June 2: Class 3: Multiple Vanishing Points Streets that twist and turn, stairs and roofs
+ DATES AND TIME Classes are 3 Sundays, May 19, 26, and June 2, 2024 at 9am PDT Seattle time (12noon New York, 6pm London) for 3 weeks. Each class is expected to run about 4 hours long (it goes by very quickly and is PACKED with info.)
+ Total WORKSHOP FEE is US$300.00 Included are 3 jam-packed classes on perspective and watercolor urban sketching with live crits of your work during the classes. Classes will be limited in size to a small group maximum of around 20 so that I can provide individual feedback on your work.
I’ll send scans of the completed demo and sketched diagrams for your reference after each class. You’ll have access to view recordings (not download) on Zoom for one month after the course ends. Information about how to pay, list of supplies, etc. will be emailed to registered participants.
+ HOW TO REGISTER Registration is open now. Please email me at stephaniebower.workshops@gmail.com to sign up or for more information. Thanks so much!
Understanding this above, allows you to accurately sketch this below!
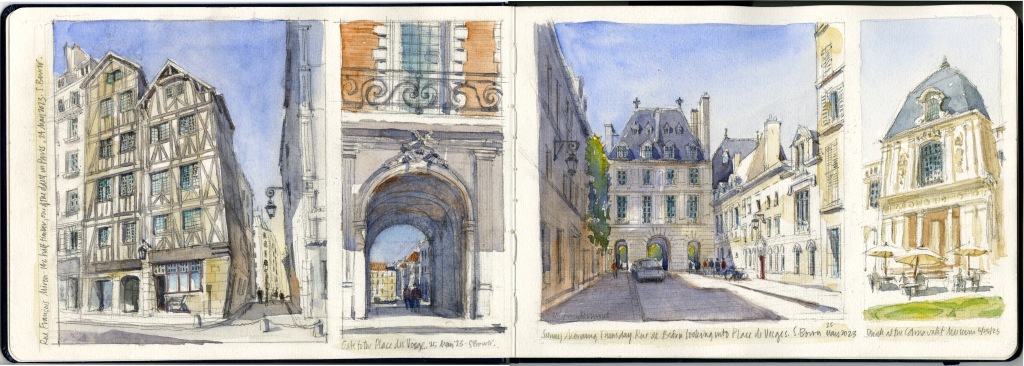
Breakfast in Paris? Oui! There are only a few spots open in my upcoming perspective and watercolor workshop in the dreamy City of Light, and the discount price ends in only 2 days on April 20! If you are interested, information is here.
So why a workshop in this city? I can think of no other city in the world that offers such beautiful and abundant outdoor public parks and spaces (and people use them!), amazing architecture that seems to glow, elegant fountains and glorious details, not to mention incredible food, wine, cheeses, pastries…when Brenda from Studio 56 asked where I wanted to teach, my first choice was THIS city!
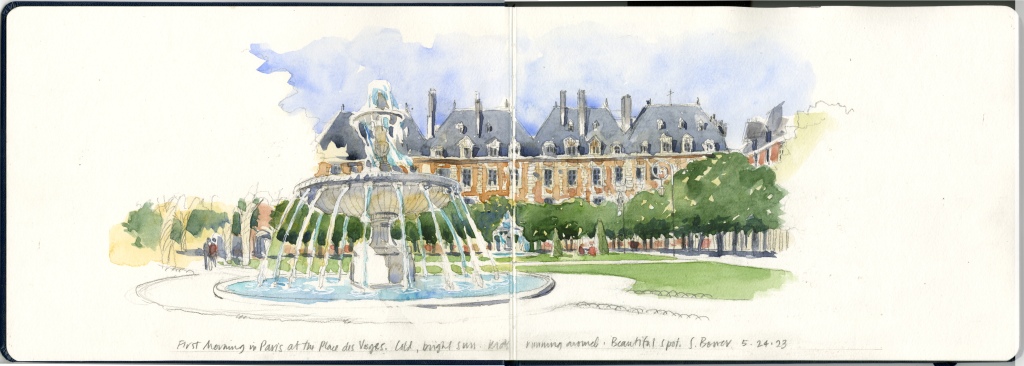
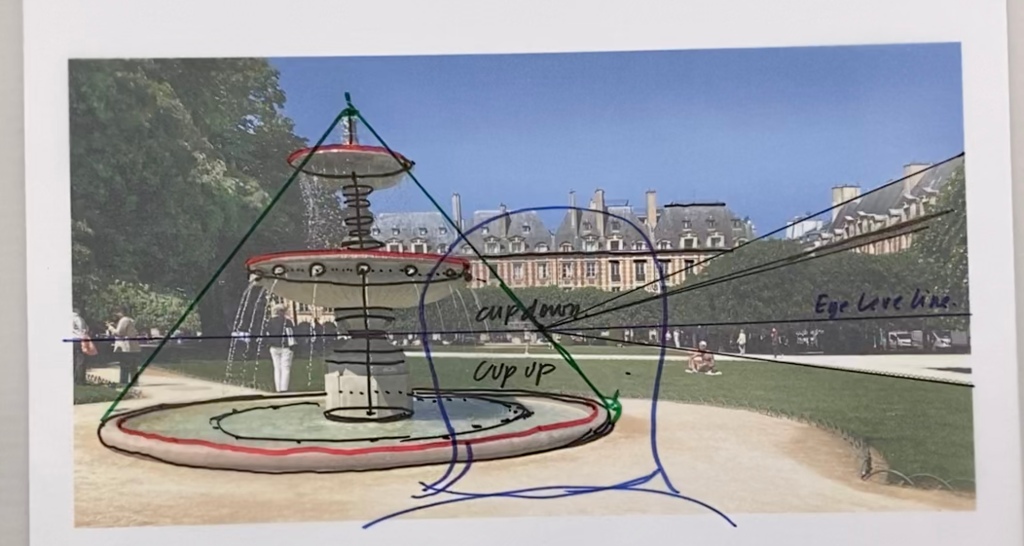
Did you notice that in this sketch in the elegant Places des Vosges, the fountain appears as a stack of ellipses, with the shapes above eye level looking different from the shapes below eye level? (There is a free demo of sketching this fountain on Studio 56’s YouTube page.)
This is why I LOVE to teach perspective! I can’t think of anyone else who really explains how and WHY perspective works. Sure, you can draw from profiles and edges, but that doesn’t really tell you about WHY what you see appears the way it does. And amazingly, this is the part that is skipped in most demos!!! This is why I teach perspective, I love seeing when folks finally understand how perspective works… it’s not hard once you know what to look for.
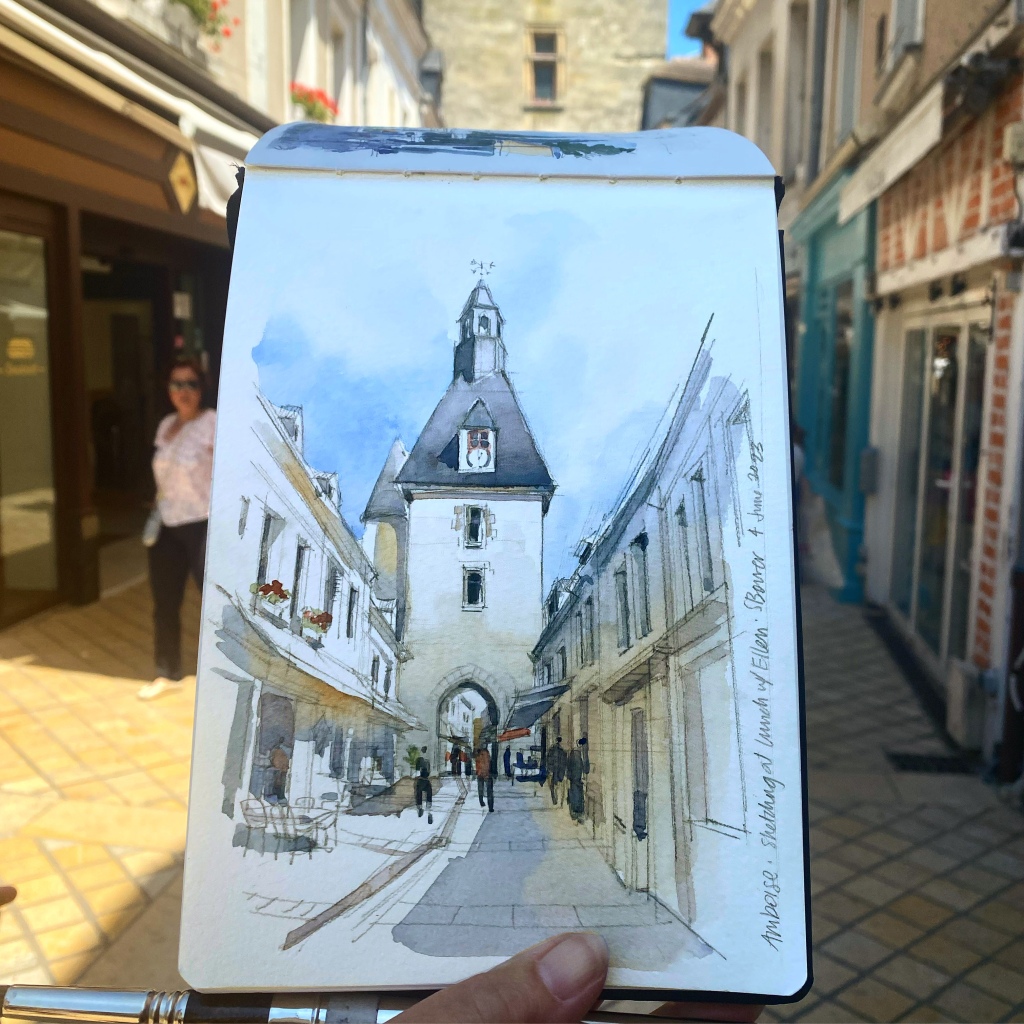
Take a look at this sketch from Amboise…can you tell it has multiple vanishing points? I’ll explain how that works in the Paris workshop!
So join me along the Seine for a toast with french wine, bread and cheese, sketchbooks in hand at all times, for a wonderful 5+ days in one of the most beautiful cities in the world! It will be a blast, and you’ll have so many ah-ha moments! À Bientôt!
(Sorry for the technical difficulties if you received this post without photos!)
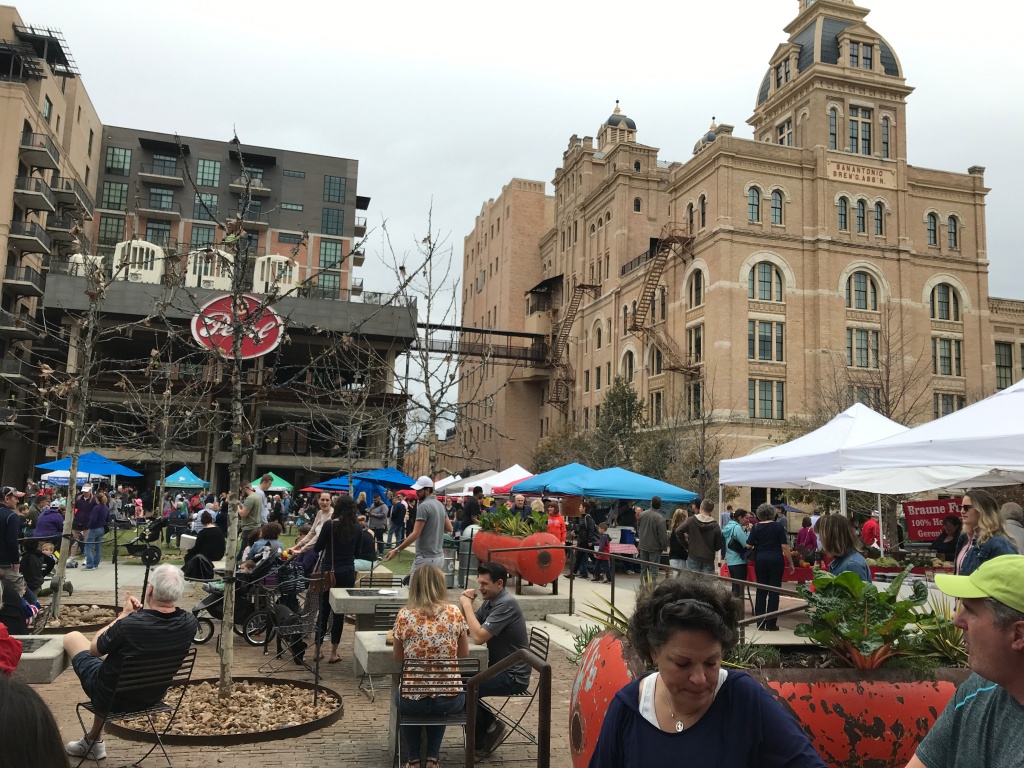
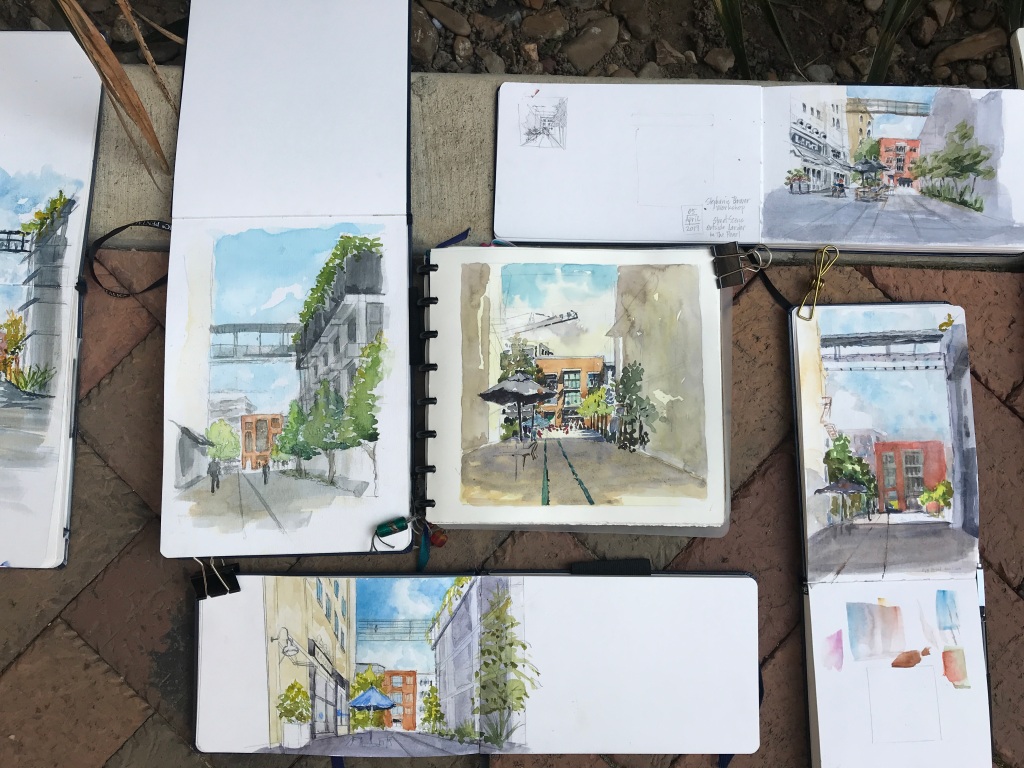
GOOD BONES | SAN ANTONIO TX | an Urban Sketching Workshop| April 13-14, 2024
I always say that good sketches start with Good Bones! In this workshop, you’ll learn the simple steps to set up the foundations of a great architectural sketch in perspective and watercolor. How do you start a location sketch? Where is the darn Vanishing Point? Watercolor is too overwhelming! Held in the beautiful and vibrant historic THE PEARL, an award-winning urban development along the famous San Antonio Riverwalk, this workshop offers 1.5 days of instruction in perspective and watercolor location sketching.
Day 1 | FULL DAY | Saturday, April 13 | 9am – 5pm* | Meet in front of Cure by 8:45am
Morning: Introduction to basic watercolor tools and techniques, using a simple palette of colors. Shade/Shadow.
Afternoon: Learn perspective basics and a simple step-by-step process to construct an architectural perspective sketch, how to build the sketch in layers and add architectural watercolor.
* One hour break for lunch.
Day 2 | HALF DAY | Sunday, April 14 | 9am – 1pm| More perspective and watercolor to cement the concepts.
GOOD BONES | SAN ANTONIO is open to 15participants with any level of experience, but it’s targeted to sketchers who want to improve their basic sketching and understanding of perspective and watercolor. We will focus on how to sketch buildings and urban spaces, and The Pearl is the perfect setting!
Workshop Registration opens Friday, February 9 at 12noon CST (San Antonio) (NOTE: as a thank you for following this blog, you have early access to register starting Thursday, February 8 at 12noon CST (San Antonio)
To sign up, contact Stephanie by email at stephaniebower.workshops@gmail.com. The first 15 emails will be accepted—first come, first served. A waiting list will be created in case spots open up.
Workshop fee is $225.00payable by Zelle or check once you are notified via email of a confirmed spot in the workshop. Instructions will be sent to all registered participants.
Cancellation In the unforeseen event the workshop is cancelled, all fees will be reimbursed. If you have to cancel your participation, please contact the instructor by email ASAP. If you cancel after March 15, 0% of workshop fee is reimbursed. A materials supply list and additional information will be emailed to registered participants.
I hope you can join me! Lots to sketch, great setting, great food, great fun!
This coming weekend, French Escapade is hosting a collection of amazing virtual workshops taught by artists around the world! Short and sweet, and taught LIVE, you can take them all back-to-back or just pick your favorites.
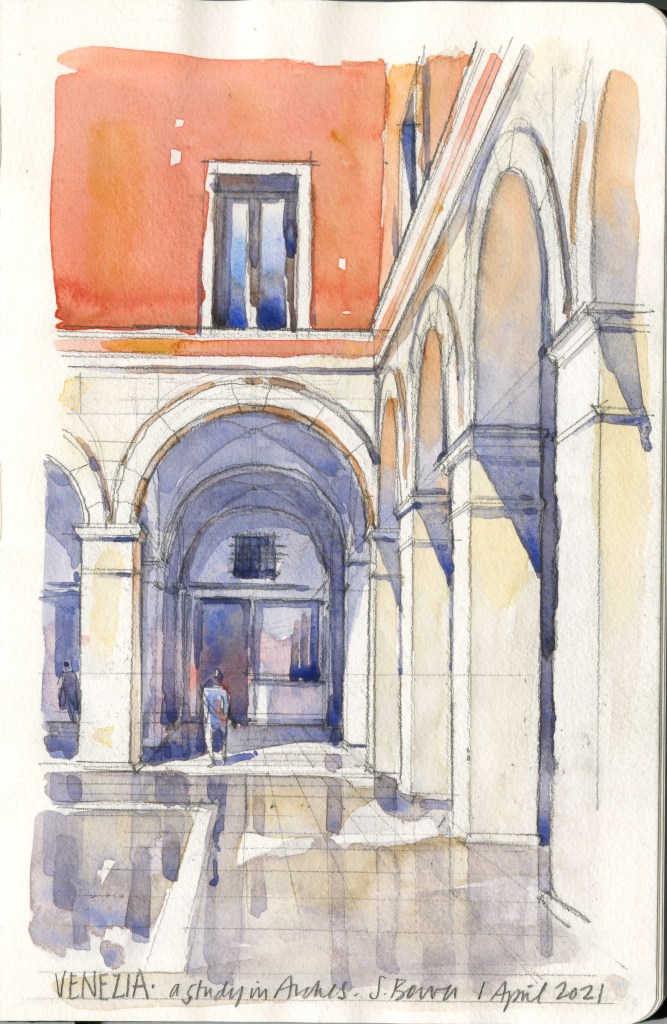
I’m honored to be teaching a class on sketching arches in lovely Venice…why arches? Because arches are not horseshoes, of course! They are in fact architecturally structural elements and have a few features that are important to capture…for example, do you know what the Spring Line is? Arches are focal points in so many buildings, so many sketches…I’ll share my tips and shortcuts for getting them right!
It’s been a long time since I’ve taught a class (had to stop to work on the book!), and I’m so excited to get back at it. I hope that you can join us! More info and registration here. GRAZIE!
UNDERSTANDING PERSPECTIVE | LIVE online masterclasses in perspective sketching made easy with Stephanie Bower
Do you fear or fake perspective sketching?
Can’t figure out how to start a perspective sketch?
And where is that darn vanishing point anyway?
Understanding Perspective is a LIVE online course that makes perspective sketching easy! I’m Urban Sketcher, workshop instructor, architectural illustrator, and author Stephanie Bower, and I’m excited to offer this course to anyone wanting to finally understand how perspective works. Perspective is easy when you know what to look for!
This course is a live, interactive 6-part online class taught via Zoom in which you’ll learn by drawing along with me in real time. In each class, we’ll take notes and sketch together as I present perspective concepts in a crafted PowerPoint presentation, then we will apply those concepts in a step-by-step sketching demo that we will draw and paint together. And like an in-person workshop, you’ll see me work and I’ll answer your questions LIVE.
With my background as an architect, I’ve taught perspective sketching in architecture and interior design programs at colleges and universities for decades. I’ve drawn on that experience to create a course that starts with easy concepts and progresses through many aspects of sketching buildings and spaces in perspective. You’ll see and learn things that you could not get in an in-person workshop! Concepts are explained with simple diagrams, together with loads of photos and sketching examples — information that you can incorporate into your sketching now, regardless of your preferred sketching or painting style or media. It’s about getting the “good bones” right!
The course is broken into two sections, with 3 classes in each section. You can take the first 3 basic perspective classes, and if you want to continue with more complex topics, you can sign up for all 6 classes. Here’s a breakdown of the content:
Understanding Perspective
Class 1: Creating a Road Map to Follow
The foundations of a perspective sketch in 3 simple steps
Demo
Class 2: Perspective Fundamentals
One and two point perspectives—what’s the difference?
View Angles and View Eye Levels
Demo
Class 3: The Importance of Foreshortening
Foreshortening
Easy, wide-angle perspectives
Demo
Understanding Perspective | Advanced
Class 4: Multiple Vanishing Points
Streets, Roofs, Stairs
Demo
Class 5: Circles in Perspective
Ellipses
Arches (they are not like horseshoes!)
Demo
Class 6: Looking UP
Towers are like wedding cakes
Domes are round
Demo
++++++++++ WORKSHOP FEE
Understanding Perspective: Classes 1-3 only, Workshop fee is US$135.00
Understanding Perspective + Advanced:Classes 1-6, Workshop fee is US$260.00
Workshop fees are payable by check for US participants (preferred) or by PayPal for US and international participants.
++++++++++ DATES AND TIMES
Session 1: Sundays at 9am Seattle time (12noon New York, 6pm Paris) Starting September 20 for 6 weeks (September 20, 27, October 4, 11, 18, 25.) Note: this class is particularly targeted to beginning sketchers.
Session 2: Mondays at 4pm Seattle time (7pm New York; 9am Tuesdays in Sydney, Australia) Starting September 21 for 6 weeks (September 21, 28, October 5, 12, 19, 26.)
Each class is expected to run about 2.5 hours.
Classes will be limited to approximately 15 participants
Additional sessions will be added at future dates and times!
++++++++++ HOW TO REGISTER
REGISTRATION OPENS SEPTEMBER 7, 2020 at 10am Seattle time:
When registration opens on September 7, send an email to StephanieBower.Workshops@gmail.com indicating which workshop session (session one or two) you’d like to take, and if you plan to take classes 1-3 or 1-6.
I’ll sign up participants in the order your email was received.
Payment instructions will be emailed to those who have a spot.
Additional information and a list of materials will be emailed to registered participants.
++++++++++ QUESTIONS?
During this class, will you be sitting outside on location or are we working from photos?
Sadly due to the pandemic, we cannot sketch together live on location just yet. This will be the next best thing as you join me in my tiny studio and we work from carefully selected photos with the understanding that ultimately, the course is about location sketching. In some ways, you’ll see the demos BETTER than when done in person, as Zoom will allow you to look at my sketches up close.
What do you mean by an “interactive PowerPoint”?
I’ve created these classes to mirror a real college course. Most of the information is delivered through detailed PowerPoint presentations that I’ve developed. I’ll pause throughout the presentation so that you can draw and take notes, and I will sketch along with you as well. At the end of each class, we’ll apply the concepts learned to an actual live demo. I’ll draw and paint a scene step-by-step so that you can also draw and paint with me at the same time. And before each class, I’ll email participants a worksheet that they can print out and use for notetaking or simply to help them follow along.
I’m new to sketching, is this class OK for me?
YES, I love teaching beginners! If you are new to perspective, or simply want to improve your knowledge and skills, this class is for you. The Sunday morning session is particularly targeted to brand new sketchers.
I’m new to sketching and am worried I’ll be overwhelmed. Can I only take the first three classes?
I break up perspective concepts into easy to understand segments, so it shouldn’t be a problem for most people to take the entire course. But if you want to pace yourself, you can indeed take the first three classes, then at a future time (provided space is available), you can take the second set of three classes. The course is structured to allow participants to do that!
I’m already a pretty good sketcher, will I learn anything new from this class?
YES! Even seasoned sketchers will benefit from seeing this approach and for the deep dives into architectural elements like multiple vanishing points, ellipses, and domes. I’ll also show lots of shortcuts to sketching complex subjects in simple ways.
Will there be homework?
Homework is optional, but I’ll provide a few images at the end of each class that you can work on at home and at your own pace.
I don’t have a computer or tablet, can I still take this class from my phone?
Because this course is very visual and the information is quite detailed, you’ll need a large screen like a computer, laptop, or large tablet to do this course. A phone or small tablet will not work.
What art supplies will I need for this class?
You’ll need your basic sketching equipment, including watercolors. I’ll email participants a list of supplies.
What equipment do I need for this class?
Use the largest screen and best wifi connection available to you!
You will need to have ZOOM downloaded onto your computer (ideal), laptop, or large tablet.** It is a free online download that is easy to use and perfect for this course. Instructions on how to join the live class will be emailed to all registered participants.
**Note: We will be using the side-by-side feature for viewing on Zoom. That way, you can see both the PowerPoint and my sketches at the same time. That’s why you will need as large a screen as possible!
How does this course compare with your Craftsy classes and books?
The biggest difference between this class and Craftsy and my books is that this is LIVE instruction! You can ask questions and I’ll answer in the moment. Most of this content is brand new, and doing the live demo together at the end of each class will cement the concepts you are learning.
Will this class be recorded to show again at a later date in case we cannot participate in the live classes?
At this time, there are plans to only do the live classes–no recordings. One, I don’t have a camera that would work, and two, the Zoom recordings are apparently not very good quality. So only live for now!
Will you be offering more classes in the future?
Definitely! I intend to keep offering Understanding Perspective. If you’ve got suggestions for other days and times, please let me know. The plan is to also add more courses, such as sketching interiors. So stay tuned!
Thanks so much for your interest in this course! I hope to see you on Zoom!
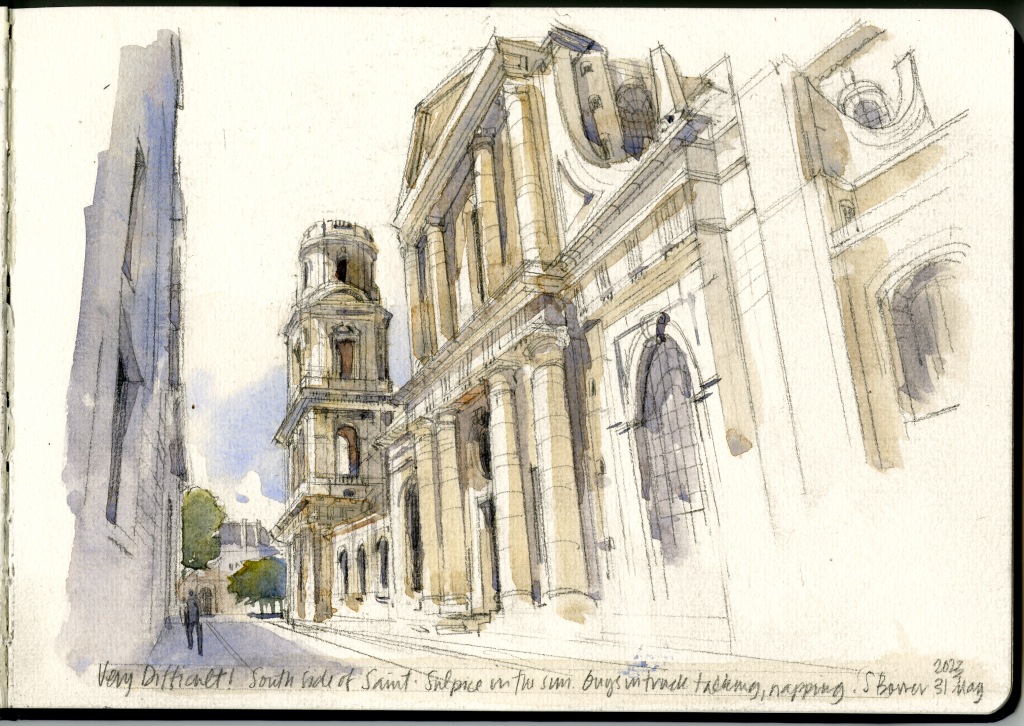
Huff and puff up the steep bridge, through the Porta Santa Maria, turn and look back at this view as you emerge into the Piazza San Pietro. The workshop group often sketches here in the morning while we sit in shade and the facades are bathed in crisp morning light, plus the bar (what we call a cafe) on the piazza opens early and serves yummy lattes. Appropriate, as apparently there was a market here long ago.
Look carefully at this wide-angle view and you’ll see blue sky in some of the windows of the Renaissance era Palazzo Colesanti…yes, the building collapsed into the valley below and all that is left is the facade! The outdoor stair is called a proferlo and is typical of this area of Italy. The gray stone around the windows is a very dense balsatina, which is mined locally. It’s also used for some amazing fireplace throughout town.
In terms of technique, this is where we learn to leave a swath of the paper as white untouched by paint in order to get a sense for the sun hitting the face of the building and ground. This is also where we learn to do varied washes of color so the color isn’t flat and also talks about the materials and stone texture. Just look at all the colors that are dropped into any one facade! That was done with one layer of watercolor wash. And my favorite part, just look at the arch on the far right under the stairs…that glow of red is a drop of Daniel Smith Quinacridone Burnt Orange into wet paint. I love that color!
I am looking back as a way to dream about next year…gosh I miss this place!
With Paris workshop registrations starting tomorrow, it’s got me thinking a lot about my time in this extraordinary city back in 2013. I had been awarded an amazing architecture fellowship, The Gabriel Prize, which meant I was able to live in Paris for 3 months to learn about architecture by sketching on location (my project settled on the use of perspective in the gardens at Versailles and Vaux-le-Vicomte). Unbelievably great and challenging time. It was an opportunity that would change my life forever and lead to amazing opportunities. But of course, at the time, I had no idea any of this would happen!!!
A big part of what made it life-changing was having the luxury of time in an inspiring setting to figure out who I was as an architect and an artist. I literally stayed up nights wondering if I was a pen or a pencil person! Would I draw a lot or paint a lot, how would I hit that sweet spot of having the right balance of both? What colors and equipment would I settle on using? This meant a fair amount of experimentation with few “successes”, although in the end I realized — and this is an important tip from the new book — we shouldn’t spend a lot of time thinking about sketching… instead, just do it. Do anything. Don’t worry about style or if you like your work or not, just listen to your inner voice and do anything… your style, your way of working will emerge as long as you keep moving in a forward direction.
So, one of my sketching experiments was in underpainting. Many artists start their painting with painting light washes of transparent colors like aureolin yellow, cobalt blue, and permanent alizarin crimson to establish areas of light and dark. Underpainting also unifies a painting, as there is a common layer at the foundation that is still just barely visible with the other transparent layers laid on top. I do this all the time in my studio work, but not very often when sketching in the field. It’s an extra step that takes time, especially since you have to wait for it to dry before doing anything else. It’s scary to start to apply watercolor, so another benefit of this wash is that it allows me to “dip my toe in the water”, aka start painting without making a huge color commitment. Helps me shake off my painting nerves!
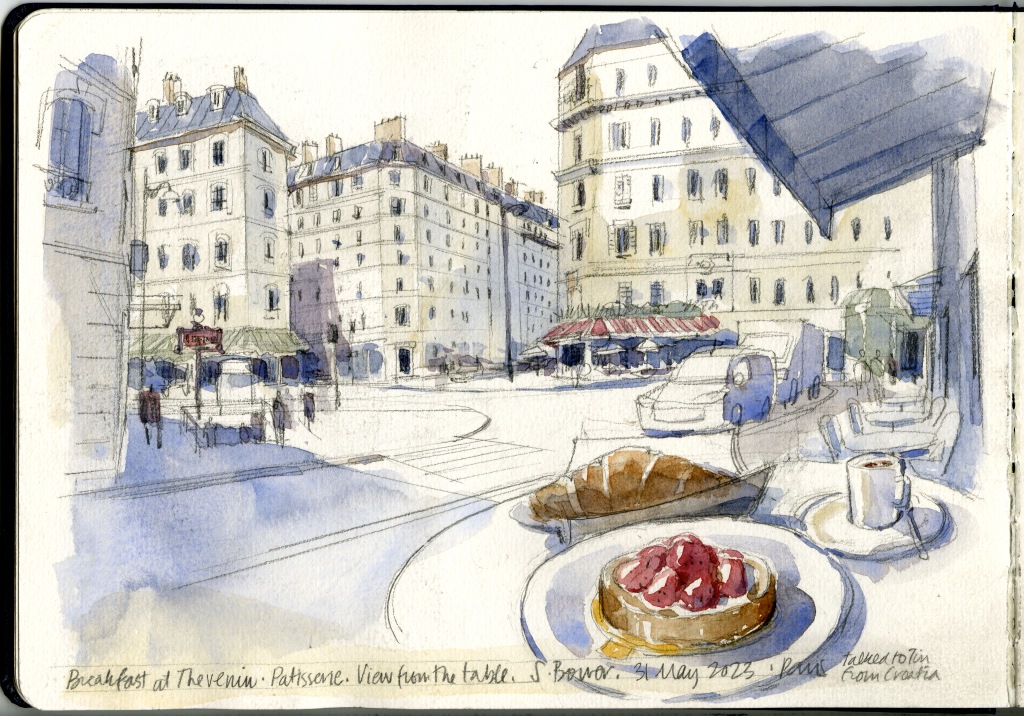
But here, I wanted to emulate some beautiful sketches we have at home that were done by my husband’s Croatian great-grandfather. He was the head of the Yugoslav railroads, as well as a poet and artist who painted incredible watercolor scenes on the heavy yellow paper used for printing train schedules! It’s fun to flip over the paintings and see the schedules.
For these sketches, I tried to mimic the warm yellow paper he used by underpainting with yellow ochre. Once it dried, I painted other layers on top to create 3-dimensional shapes… and for surfaces hit by LIGHT, I painted with an opaque white. I rather liked the glow this gave the sketches, and it launched me into using yellow ochre to underpaint probably a majority of my sketches now. And you can see the beginnings of what would become my “style”! I’m eager to go back and try again, now that I have more sketching know-how.
So thanks to great-grandfather Villim Filipasic for his inspiration. I hope my great-grandchildren, should I be blessed some day, will look at my sketches with the same love that I look at and appreciate his…
Yep. I’m soooooooo excited to be heading back to The City of Lights this June. I’ve dreamt about teaching a workshop in this gorgeous place for years. Here’s the scoop:
Good sketches start with Good Bones! In this workshop, you’ll learn the simple steps to set up the foundations of a great architectural sketch in Perspective and Watercolor. How do you start a location sketch? Where is the darn Vanishing Point? And how do I start painting? Held in the amazing historic Marais of romantic Paris, this workshop offers 2 full days of instruction. The first day is an introduction to the fundamentals of on-location perspective through demos and sketching on-site. Day two introduces basic watercolor mixing and techniques, and in the afternoon, we put it all together!
Friday, June 19 | Meet for a bring-your-own picnic dinner at the Places des Vosges.
GOOD BONES Day 1 | PERSPECTIVE| Saturday, June 20 | 9am-5pm* | Meet in the Place des Vosges
Learn perspective basics and a simple step-by-step process to construct an architectural perspective sketch, how to build the sketch in layers.
Learn what to look for when sketching perspective on location—how to find your eye level and vanishing points to provide the good bones of any sketch.
Learn how to measure proportions and relationships of spatial elements.
GOOD BONES Day 2 | WATERCOLOR| Sunday, June 21 | 9am-5pm* | Meet in the Place des Vosges
Introduction to basic watercolor tools and techniques, using a simple palette of colors.
Learn how to use watercolor to enhance the sense of architecture and space in your sketches.
In the afternoon, put perspective and watercolor together.
* One hour break for lunch.
————————————————————————————————————————————
GOOD BONES PARIS is open to 15participants with any level of experience, but it’s targeted to sketchers who want to improve their basic sketching and understanding of perspective and watercolor.
Workshop Registration opens Sunday, February 16, 2020 at 8am Seattle time/ 5pm Paris time. To sign up, contact Stephanie by email at stbower@comcast.net The first 15 emails will be accepted—first come, first served. A waiting list will be created.
Workshop tuition is US$295.00, by check or PayPal (tuition includes PayPal transaction fees.)
***And for you blog followers, I’m offering early-bird spots today and tomorrow as a THANK YOU. Contact me directly at stbower@comcast.net ASAP if you’d like to be pencilled in to a spot. And if you also sign up for the French Escapade workshop in the Loire, I’ll knock of $100 from the cost of this workshop, and FE will also reduce their price. Paris will be a great warm up for the LOIRE!!
There are also still workshop spots open for Seville in April (before it gets too hot in southern Spain) and one spot in Civita in June.