Thinking about an in-person or online workshop next year? Maybe a bit of travel? Contact me or follow the links for information and registration. And check the workshop tabs at Drawing Perspectives for updates. Thank you!
LIVE ONLINE on Zoom: Understanding Perspective + Lots More! | Three, 4-hour classes that finally demystify perspective and watercolor sketching. These classes are packed with information, you’ll learn tons. More classes will be added in the Spring.
January 5, 12, 19, 2025 at 9am PST | Only 2 spots left! Email me for info at stephaniebower.workshops@gmail.com
____________________
LIVE ONLINE: Terracotta Explorer: Perspective in Spain, Towers are Like Wedding Cakes | This is part of an ongoing series of classes through Terracotta, whose cadre of artists are among the best in the world. A few can join specifically for my one class on sketching towers.
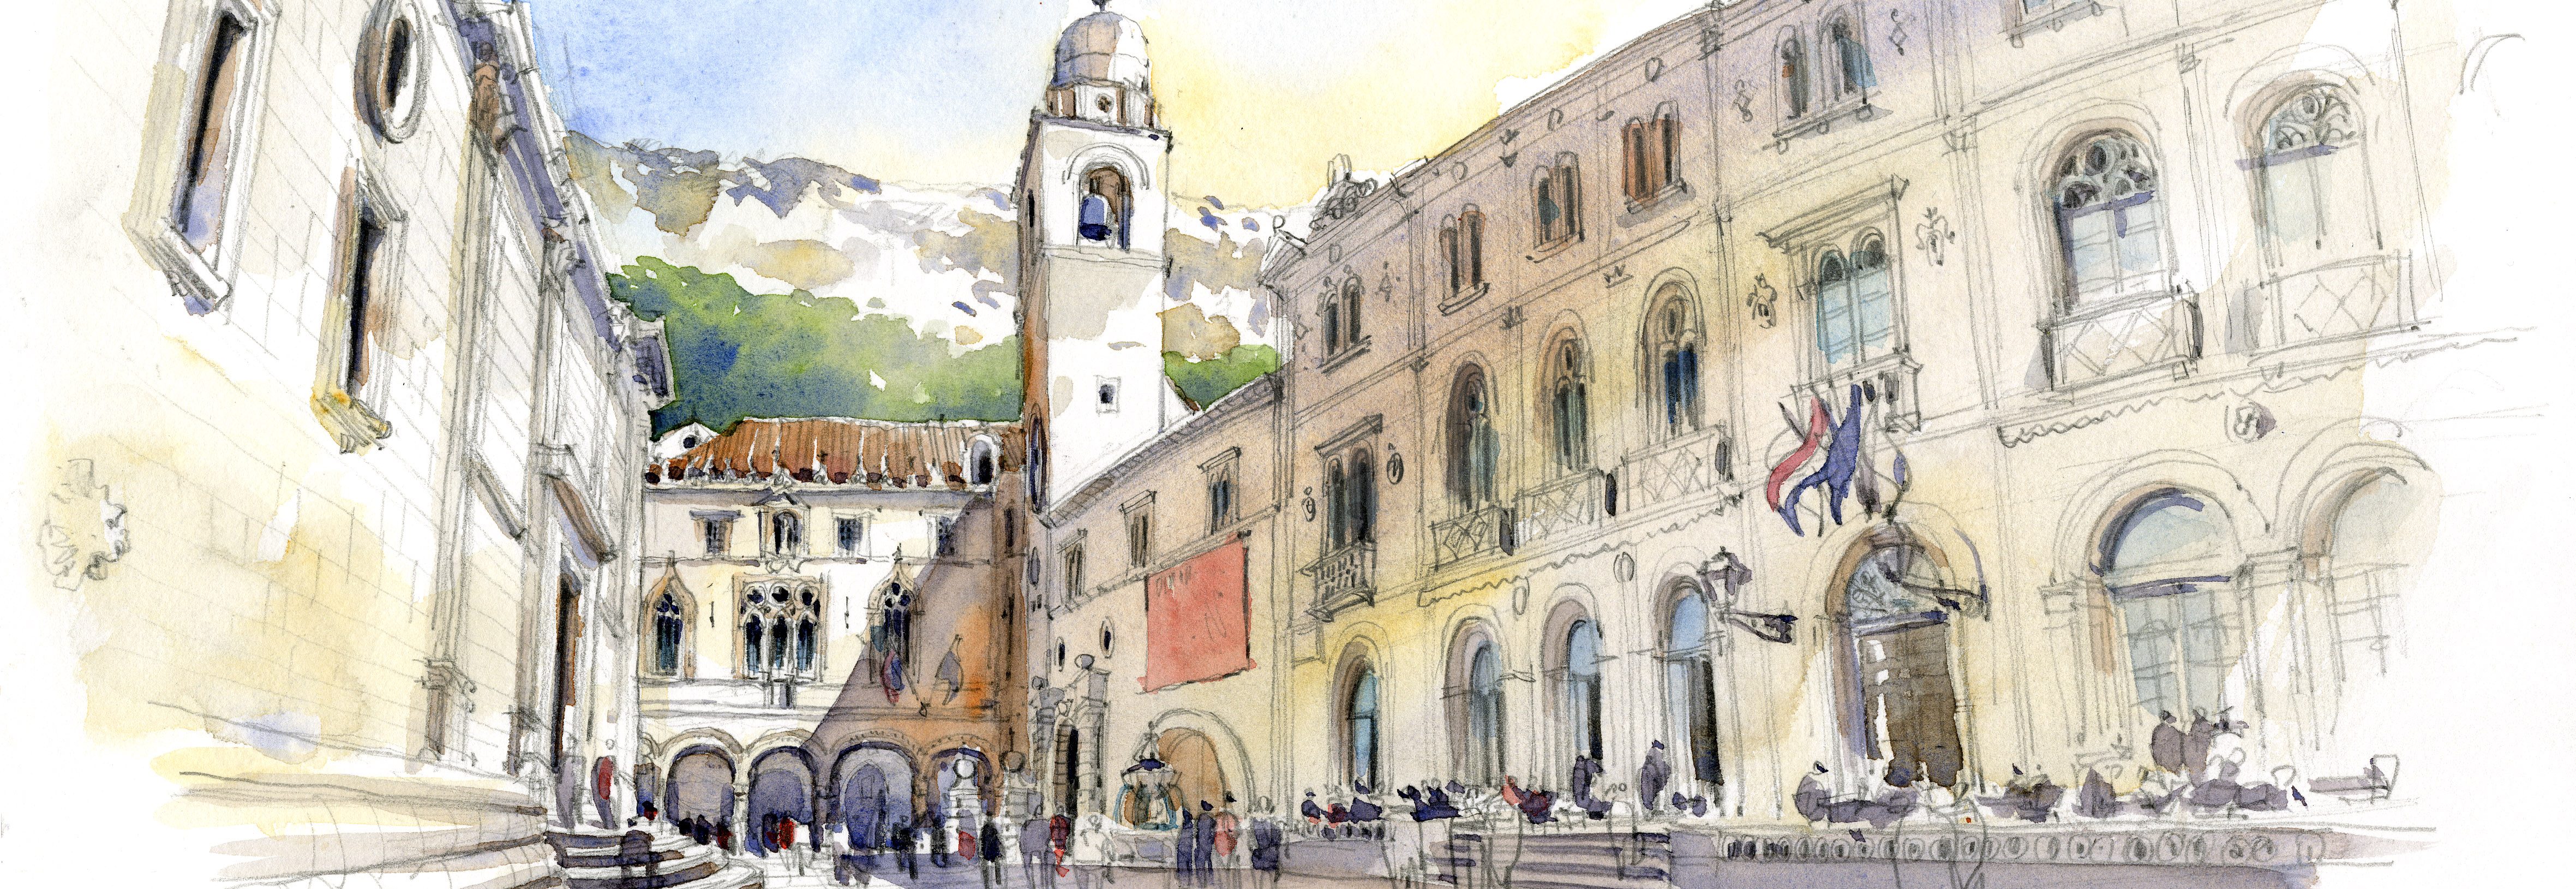
LIVE ONLINE: Terracotta Symposium: The Foundations of Architectural Art | This event is not to be missed! Join four instructors who specialize in sketching and painting architecture–the rockstar Thomas Schaller, Alex Hillkurtz, Pablo Questa, and me (Stephanie Bower! ) — and immerse yourself for a weekend in the world of architectural beauty as each artist leads an in-depth session with live demonstrations and an interactive Q&A. Lifetime access to recordings. My workshop will be on sketching this view of Turl Street in Oxford.
Use code BOWER50 to get a whopping $50 off the early bird price!
____________________
LIVE IN-PERSON | Urban Sketching in Quebec City, Canada | You’ll think you are in old world Europe, but it’s Canada! Join me and Studio 56 for 6 nights, 5 days of instruction as you learn how to sketch streets, fountains, elegant towers, and more…lessons in the morning, cultural visits and sketching in the afternoons. Register now for early bird pricing.
LIVE IN-PERSON: Northern California Coast at Pacific Grove | Imagine 5 days of sketching this beautiful coast, old churches and missions, and more for a combination of in studio and outdoor urban sketching. Sponsored by MISA in their beautiful new workshop location.
I’m squeezing in a workshop before the end of the year!
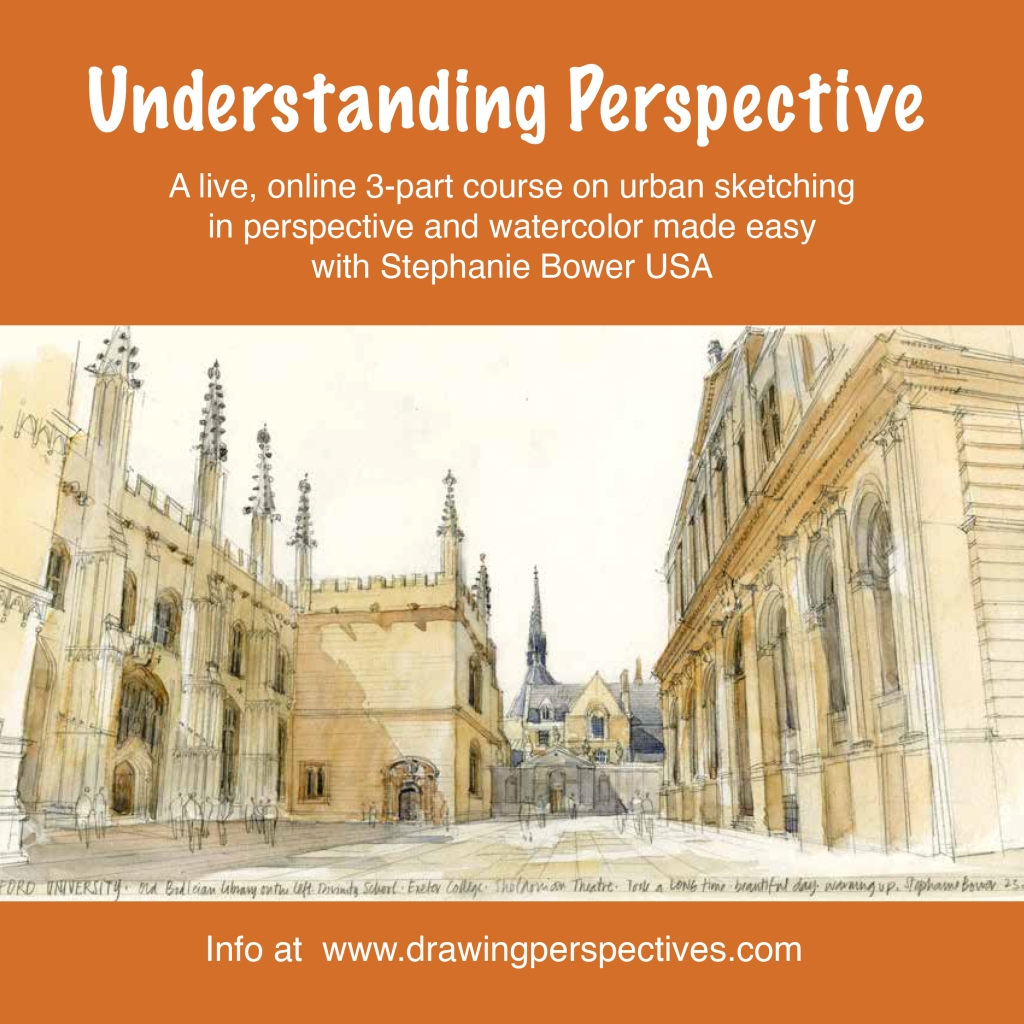
UNDERSTANDING PERSPECTIVE | LIVE online Urban Sketching Course in Perspective & Watercolor, made easy with instructor Stephanie Bower USA
Do you fear or fake perspective sketching? Can’t figure out how to start a sketch of a building? And where is that darn vanishing point anyway? Do you know how to paint shade and shadow differently? They are not the same!
Understanding Perspective is a LIVE online course that makes perspective sketching easy! I’m Urban Sketcher, workshop instructor (I’ve taught at 7 USk international symposiums!), architectural illustrator, and author of three books Stephanie Bower, and I’m excited to offer this course to anyone wanting to finally understand how perspective works. Perspective is easy when you know what to look for!
This course is a 100% live, interactive 3-part online class taught via Zoom in which you’ll learn by drawing along with me in real time. In each class, we’ll take notes and sketch together as I present perspective concepts in a crafted PowerPoint presentation, then we will apply those concepts in a step-by-step sketching demo that we will draw and paint together.
What makes this course different from others? Two things: We diagram the perspective views, explaining why the views look the way they do, SHOWING how perspective works. Most instructors skip this part! And second: it’s really two workshops in one. You’ll learn perspective AND watercolor technique! You’ll see me work up close (even better than an in-person workshop), and I’ll answer your questions LIVE.
Understanding Perspective, December Session 1
Dates:Sundays, December 8, 15, and 22, 2024 | 9am-1pm PST (Seattle) | 12noon-4pm (NYC) | 5pm-9pm (London) | 6pm-10pm (Paris)
Class 1, Sunday, December 8: The essentials of one-point perspective. Intro to Watercolor.
Class 2, Sunday, December 15: Two-point Perspective, it’s all about how you view your subject!
Class 3, Sunday, December 22: Multiple vanishing points in streets, roofs, and stairs.
Each class will start with an interactive PowerPoint on the topic of that day (you’ll be encouraged to take notes, ask questions, etc.), followed by a demo that we draw and paint together step-by-step. Classes run about 3.5-4 hours (it goes quickly!) Classes will be recorded, and you’ll have access to the recordings through the end of January.
Optional Homework: Along with notes and scans of the demo, I’ll send out 2-3 images after each class for optional homework. If you draw and paint them, you can send them to me for a critique.
Workshop Fee:US$300.00. Classes will be limited in size to max. 20 so you can all get live feedback. Once your registration has been confirmed, information on how to pay, a materials list and more will be emailed to all participants.
How to Sign Up: Registration is open NOW! Send an email to st.bower@icloud.com. First come, first served!
After this workshop, you’ll never fear or fake perspective again! If you have any questions, or need more info, send an email my way. THANKS!
It seems I often travel when it’s hot outside, so just when I think I’m about to drop from heat, I find a cool, dark church and slide into a pew to draw. I love the challenge of these perspective views, they really make my brain work hard! Plus I get a chance to cool down, maybe listen to some lovely music or a mass in progress. This week, I’ve been posting a collection of these drawings to IG and FB, most are images as I snapped a quick photo before they were painted on location. Usually it’s very dark in side, so it is both difficult to see what I’m drawing and painting, and even more problematic when I try to take a photo of the sketch!
The first of these was in Paris, a whopping 11 years ago –I almost refuse to believe it’s been that long– and I was in France with a 3-month architecture fellowship, The Gabriel Prize. It was a life-changing experience for me, and it’s also where I started to sketch in earnest and post my sketches online. One day, I decided to head off toward the Pantheon. It started to rain just as I was passing in front of Nôtre Dame Cathedral, so I made a quick left and headed in. Mass was in progress so the lights were turned up, and in true Urban Sketchers style, I decided to draw what was right in front of me. And my gosh, with the fire in April 2019, I’m so glad that I did. I’ve captured that space both on paper, and more important, in my mind and memory, it’s now a part of my DNA.
For me, sketching these spaces is like solving a puzzle. There is a grid to the structure that usually consists of columns and arches, so that is what I typically draw in first, very lightly. I will also start with what I call the “Shape of the Space”, the two columns and an arch in the middle of the space that gives me information about heights/widths, and proportions. Once that is blocked in on my paper, it’s just a matter of filling the details.
All but one were painted on location, but I love the web and intricacy of the line drawings almost more than the finished piece. Once the line drawing is done, I usually throw it down on the ground and snap a photo. This sketch below of San Giuseppe in Rome did not get color, as I ran out of time before the building closed. The caretaker was kind enough to give me a few extra minutes to finish the linework.
Below is my second church interior ever, also done back in 2013 in Civita di Bagnoregio, Italy, where I now teach a workshop most years. This was the first time I exaggerated the angle of the columns to either side to give the feeling of a 3-point perspective looking up.
Below is a church in San Miguel de Allende, Mexico, teaching there last year with Studio 56.
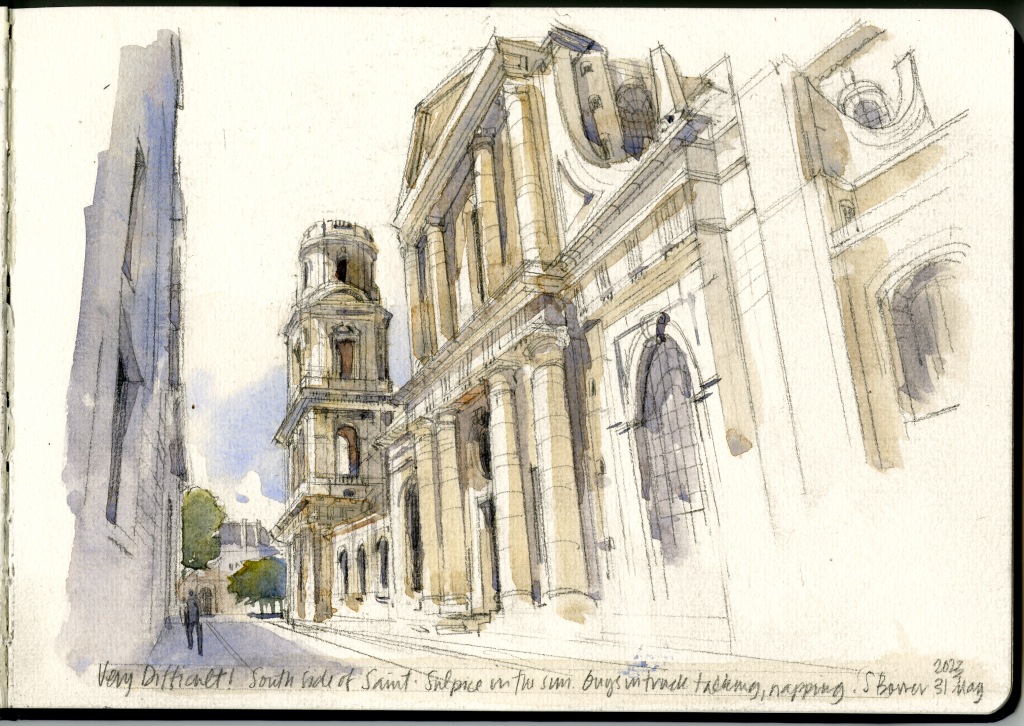
This sketch below was in Toulouse, Saint Sernin. A Medieval basilica, it was deceptively difficult, mostly because the space is so narrow (being that it’s an older church, they hadn’t completely worked out wider structural spans yet!)
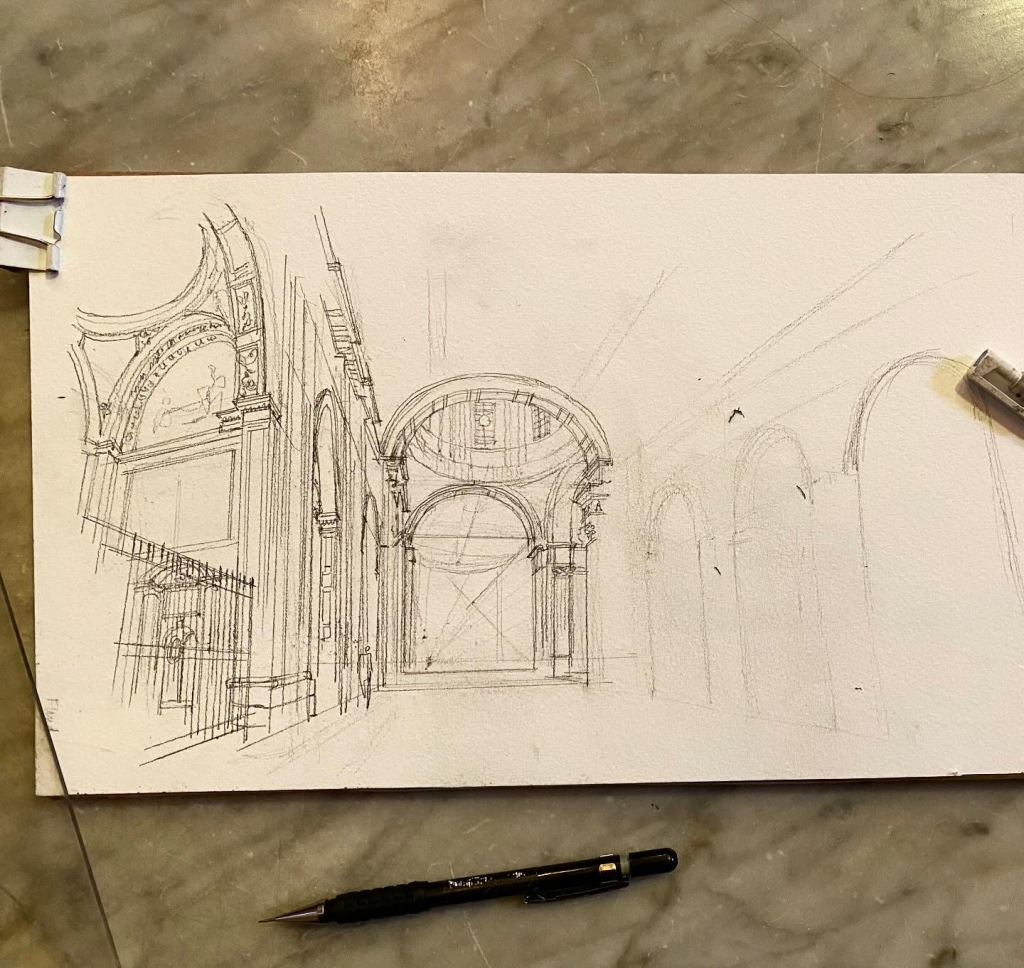
In progress at Sant’Andrea in Rome. You can see my arch and columns in the center where I start the sketch, the vanishing point and the eye level line all clearly drawn in. Arches on the right are blocked in, and because I’m right-handed, I start the final linework in another layer working left to right.
I’m figuring out that LOTS of sketchers post images that were in fact done in the studio (look closely!), so I always try to show a photo of the sketch on the spot so that you can tell it was truly done on location! An Urban Sketcher to the core!
Many more church interiors where these came from, but I hope that you like this sampling! Let me know if you want to see more of these kinds of sketches!
Anyone who knows me or my work knows I’m a huge Escoda brushes fan… since I first saw one in the hands of another sketcher on a boat in Brazil after the 2014 USk Symposium! It became my quest to find one for myself, and I finally did, and I even got to visit the factory a few years ago. I now own quite a collection, and I use them ALL THE TIME in both my studio (architectural illustration work) and when travel sketching.
Handmade by a 3rd generation family-owned business near Barcelona, you can feel the love that goes into making every brush. Beautifully weighted, impeccably crafted using machines their grandfather invented. I often say that my favorite Escoda travel brush should be on display in the Museum of Modern Art!
When selecting a brush, as a general rule, you want to get the largest size you can afford that also keeps a nice point. This is why you see really good watercolorists with massive brushes…if it holds a lot of water/pigment you can paint large areas at the beginning of your painting, and if it has a good point, you can also paint the details at the end. All without constantly going back to your palette to reload your brush.
My favorite brushes at the moment:
Escoda Reserva, round size 10or set of 3: Remember when you were a kid attempting to paint and the brush bristles were so limp, you were basically painting with a stick? You will not have this problem with Reserva brushes as they are made of Kolinsky Sable, the gold standard for brushes because these natural bristles (yes, they are from an animal and Fun Fact: stored at Escoda in a cooler on a bed of moth balls.) They have body and spring, AND they hold tons of water/pigment. A Reserva size 10 travel brush was my very first Escoda! The price has shot up over recent years, so beware the sticker shock. Tip: don’t ever scrub the paper or dry paint on your palette with this brush, or you will ruin the point.
Escoda Versatil, round, size 12: This brush is the synthetic equivalent of Kolinsky Sable. I remember a few decades back when synthetic watercolor brushes were, ok I’ll say it, HORRIBLE. Thankfully, the technology has evolved and synthetics are excellent, less expensive, take a lot of painting abuse, and are preferred by many animal rights activists. The Versatil bristles are fairly soft and hold a lot of water/pigment. I just started using this travel brush and really like it, I typically use it at the start of my sketch when I am painting big washes, then switch to the following brush…
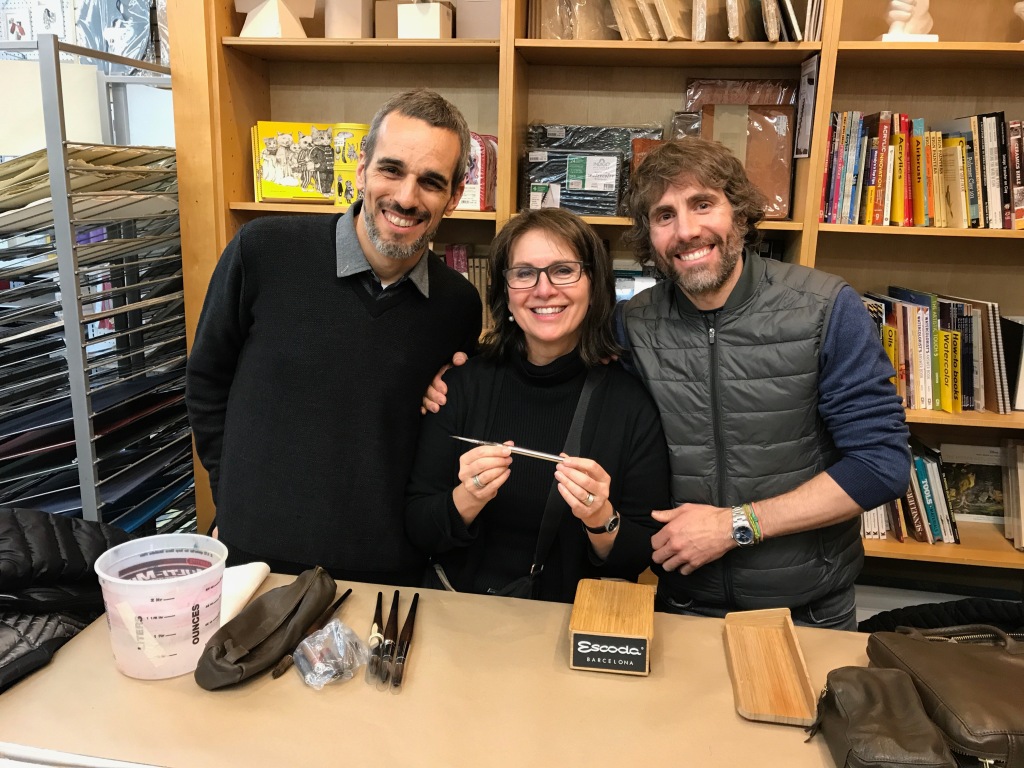
Escoda Perla, round, size 12: Over time, this has become my go-to brush for just about everything. I do use a size 14 short handle brush in my studio on larger sizes of paper, but the size 12 travel brush is great for sketchbook-sized images. The white bristles are a little stiffer and hold a bit less water compared to the Versatil, but for my way of painting, it does just about everything I need a brush to do. I remember as a stroke of great luck, I got to meet two of the cousins who run the company when they were in NYC. My gosh, I gushed like a giddy school girl meeting her favorite movie star when I met these two. So embarrassing! (See photo below with Ricard and Josep, grandsons of the founders.) They asked me what my favorite brush was (was it a test?) and I proudly said the Perla…they looked at each other and said, “Just like Zbukvic”, who is only about the most famous and influential painter in the world!! It seems I passed the test.
I was recently asked by a workshop participant how to find my favorite Perla Size 12 travel brush as it can be difficult to track down in the USA. Escoda was kind enough to send this list of stores that carry the brush–I hope that you will try it and let me know what you think!
I should add that I am now an ambassador for Escoda Brushes! Proud and a bit shocked to be included given their roster! They sent me a list of what I would need to do in this role, and I replied that I already do all those things 😉
Below is me with my brush in Varanasi India in 2017, and below that, visiting the Escoda factory in 2019 with a few workshop participants and a few USk Barcelona sketchers on a bad hair day, but happy. And yes, that’s an Escoda sketchbook, in fact, the very one that I’ve been filling lately with practice sketches at home.
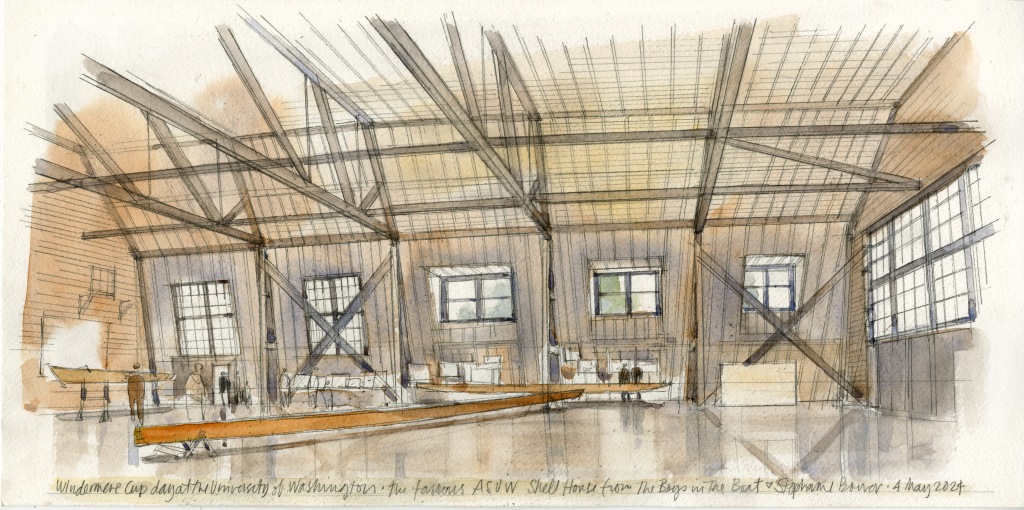
This past weekend was the opening day of boating season in Seattle and the Windermere Cup races at the University of Washington. Lots of people and boats, gray drizzle, but for me, the highlight was getting to sketch the interior of the actual UW Shell House made famous in both the popular book and the recent film, The Boys in the Boat.
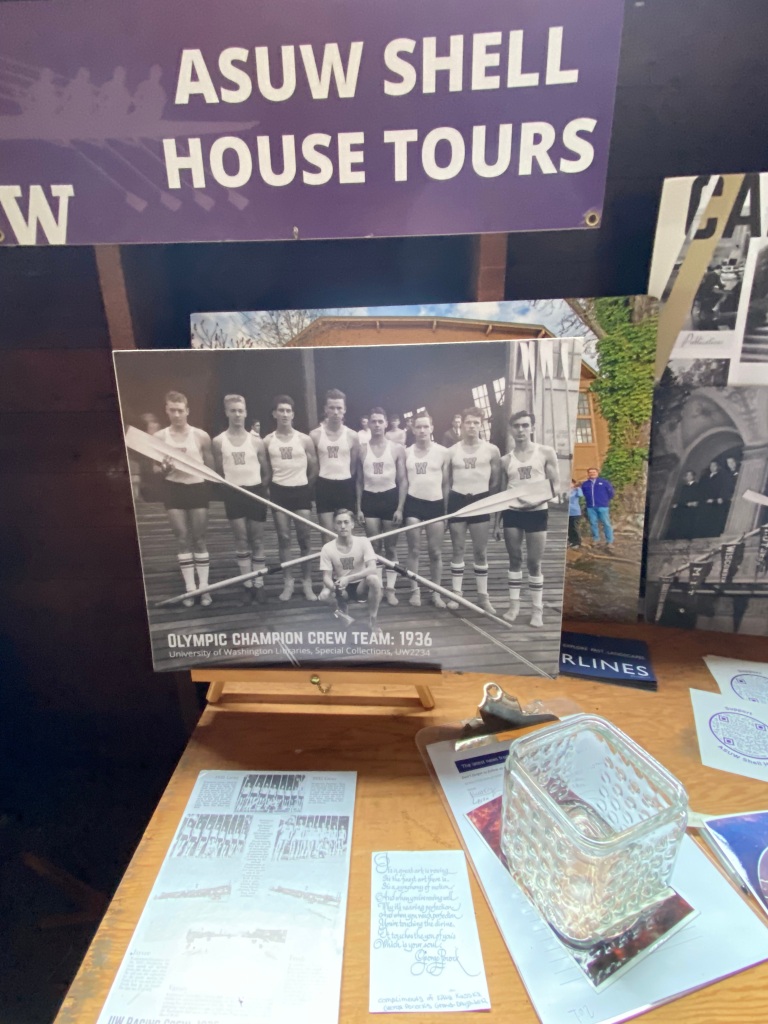
That story–a true story–is about a ragtag group of University of Washington rowers who beat the national favorites and traveled to Germany to race in the 1936 Olympics. In front of Hitler, they WON the gold medal! A proud moment for our country and a legacy that is still celebrated here in Seattle and especially at the UW. Drawing this space was an emotional experience, I felt like I was connecting with that legacy and the young men who lived and worked in this very same spot.
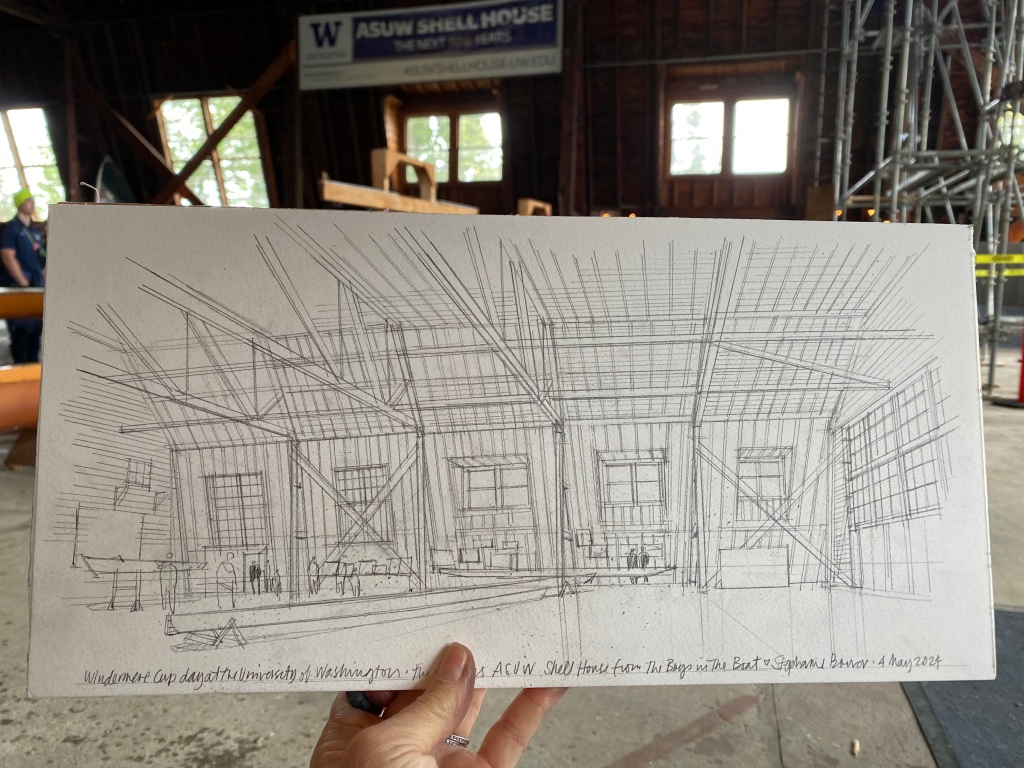
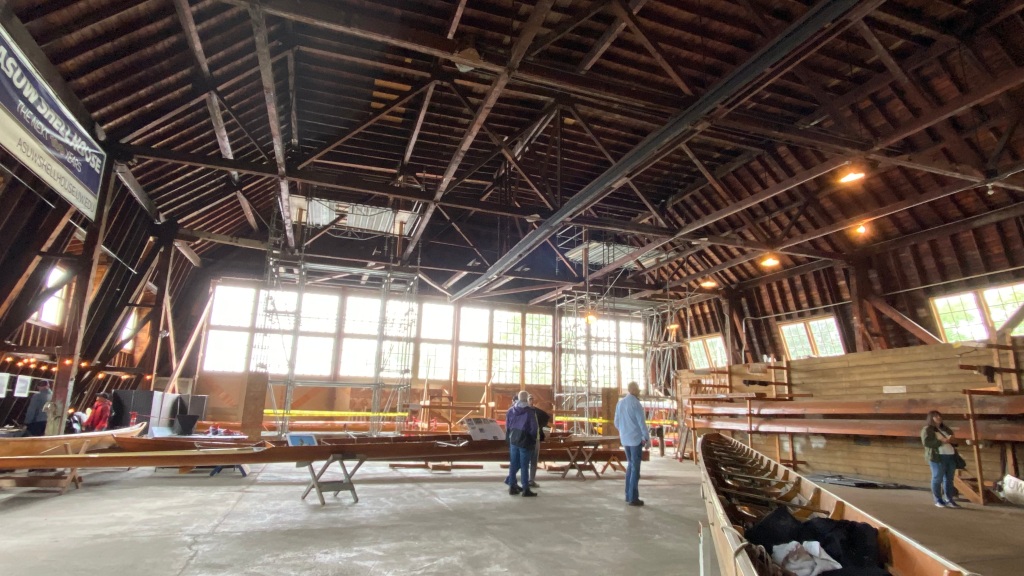
This drawing was challenging! It’s an enormous, fairly complicated space that was initially used as an airplane hangar, and the backlighting from the windows made it very difficult to see. Scaffolding was in the way too, but I kept calm, measured with my pencil, and drew in each bay of structure. Then working left to right, I started to draw in the details…some I couldn’t see well enough to figure out, but I think I got close enough!
The ASUW Shell House is soon to be renovated, and full disclosure, the project was awarded to my husband and his architecture firm, MITHUN. I’m sure they’ll do a wonderful job that will honor the history of this iconic building that holds a big spot in our hearts.
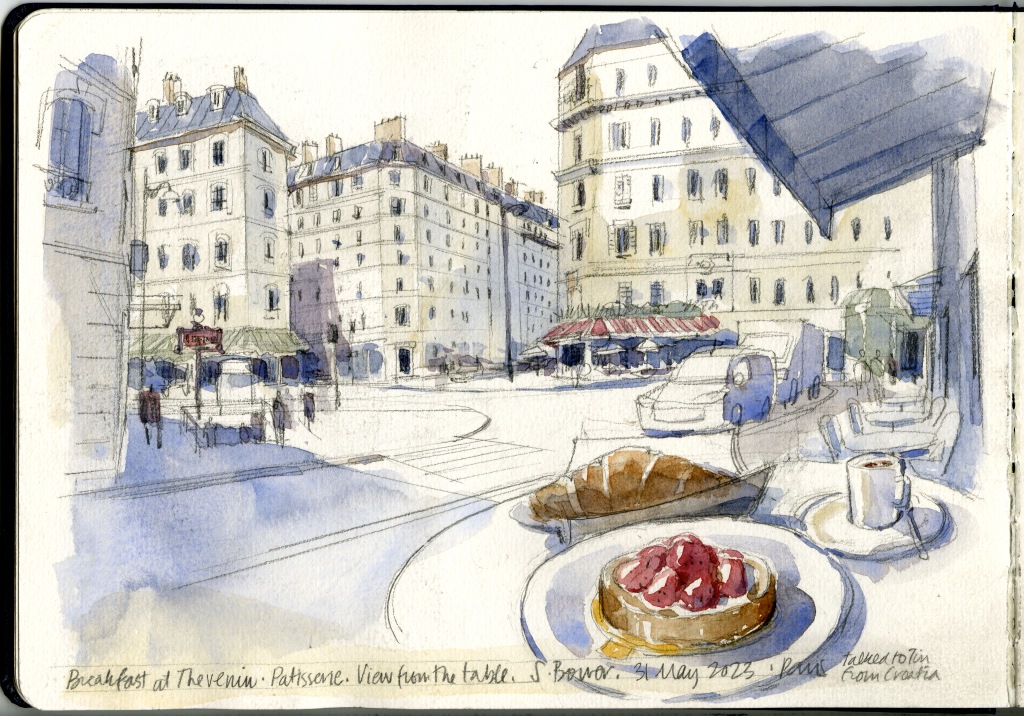
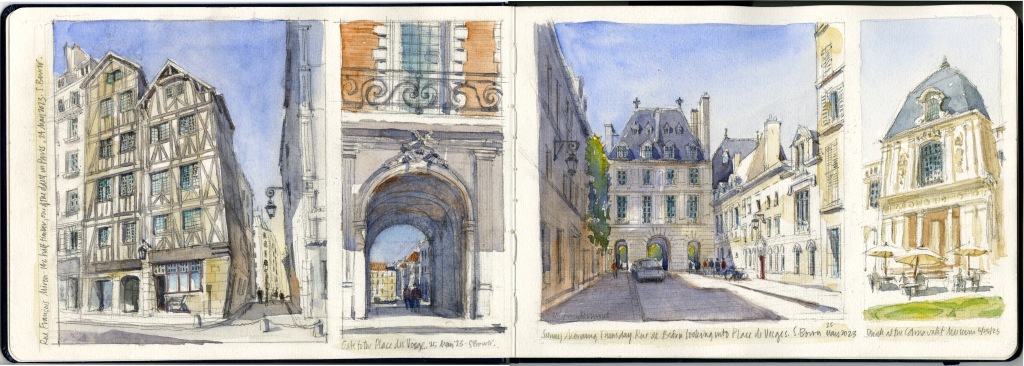
Breakfast in Paris? Oui! There are only a few spots open in my upcoming perspective and watercolor workshop in the dreamy City of Light, and the discount price ends in only 2 days on April 20! If you are interested, information is here.
So why a workshop in this city? I can think of no other city in the world that offers such beautiful and abundant outdoor public parks and spaces (and people use them!), amazing architecture that seems to glow, elegant fountains and glorious details, not to mention incredible food, wine, cheeses, pastries…when Brenda from Studio 56 asked where I wanted to teach, my first choice was THIS city!
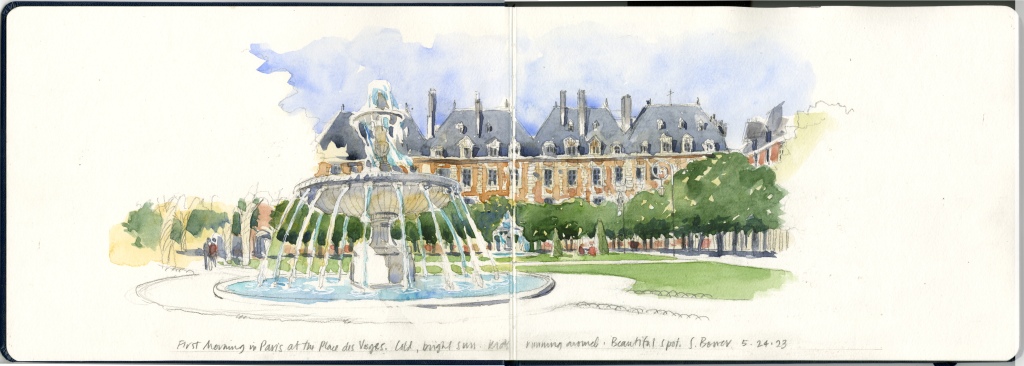
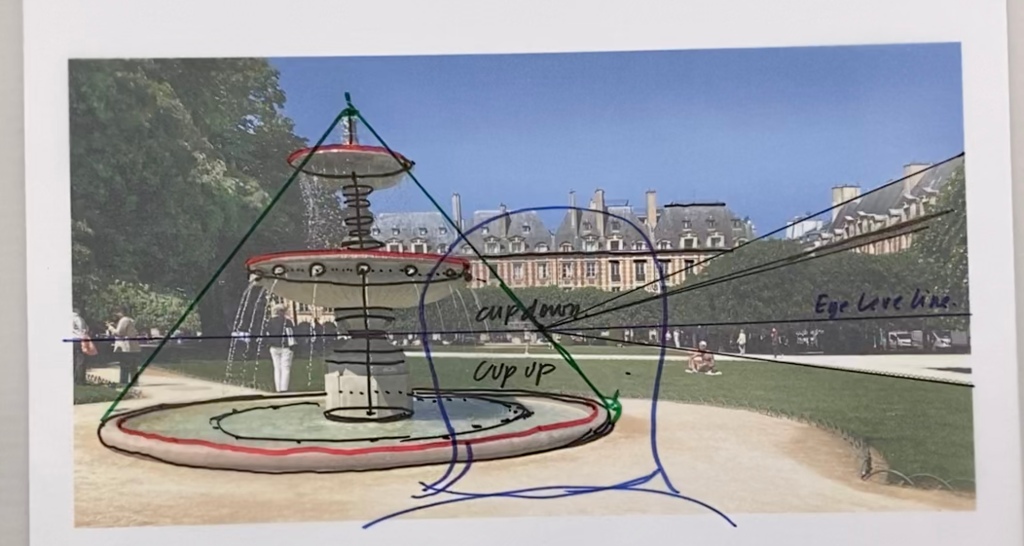
Did you notice that in this sketch in the elegant Places des Vosges, the fountain appears as a stack of ellipses, with the shapes above eye level looking different from the shapes below eye level? (There is a free demo of sketching this fountain on Studio 56’s YouTube page.)
This is why I LOVE to teach perspective! I can’t think of anyone else who really explains how and WHY perspective works. Sure, you can draw from profiles and edges, but that doesn’t really tell you about WHY what you see appears the way it does. And amazingly, this is the part that is skipped in most demos!!! This is why I teach perspective, I love seeing when folks finally understand how perspective works… it’s not hard once you know what to look for.
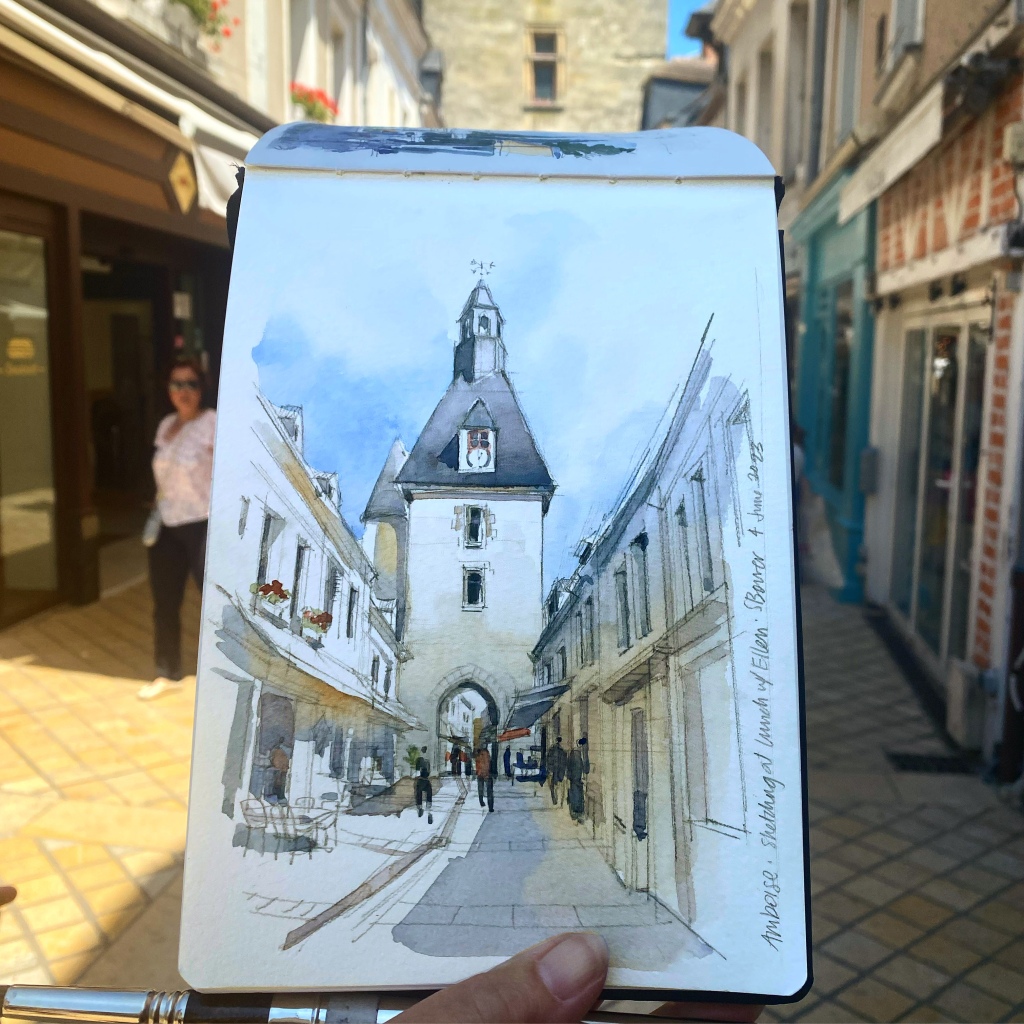
Take a look at this sketch from Amboise…can you tell it has multiple vanishing points? I’ll explain how that works in the Paris workshop!
So join me along the Seine for a toast with french wine, bread and cheese, sketchbooks in hand at all times, for a wonderful 5+ days in one of the most beautiful cities in the world! It will be a blast, and you’ll have so many ah-ha moments! À Bientôt!
(Sorry for the technical difficulties if you received this post without photos!)
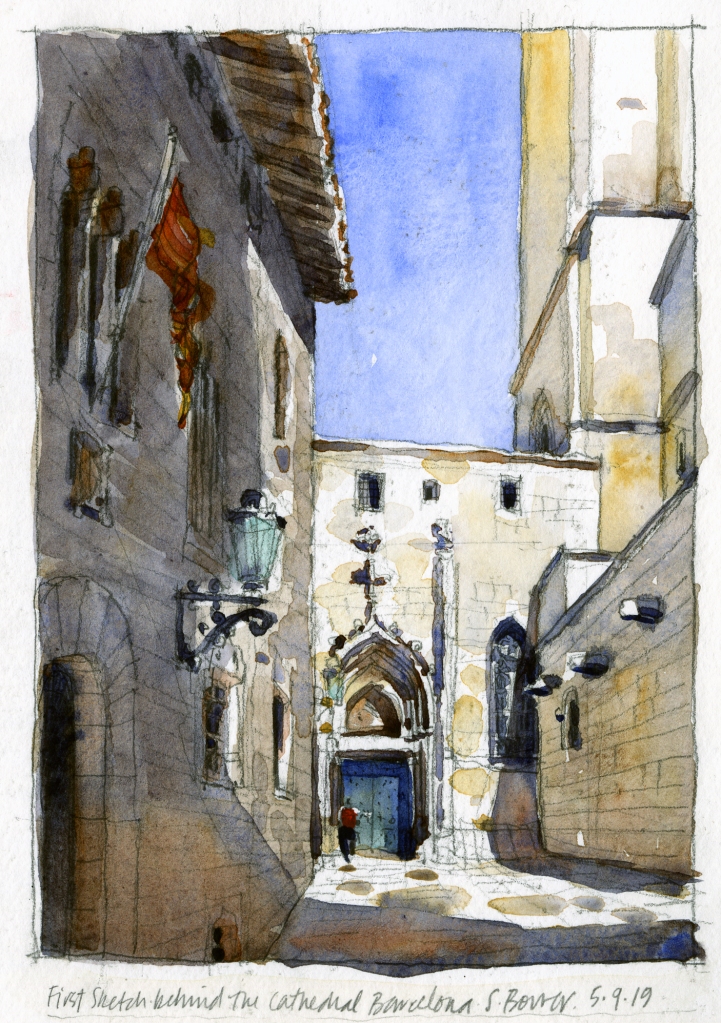
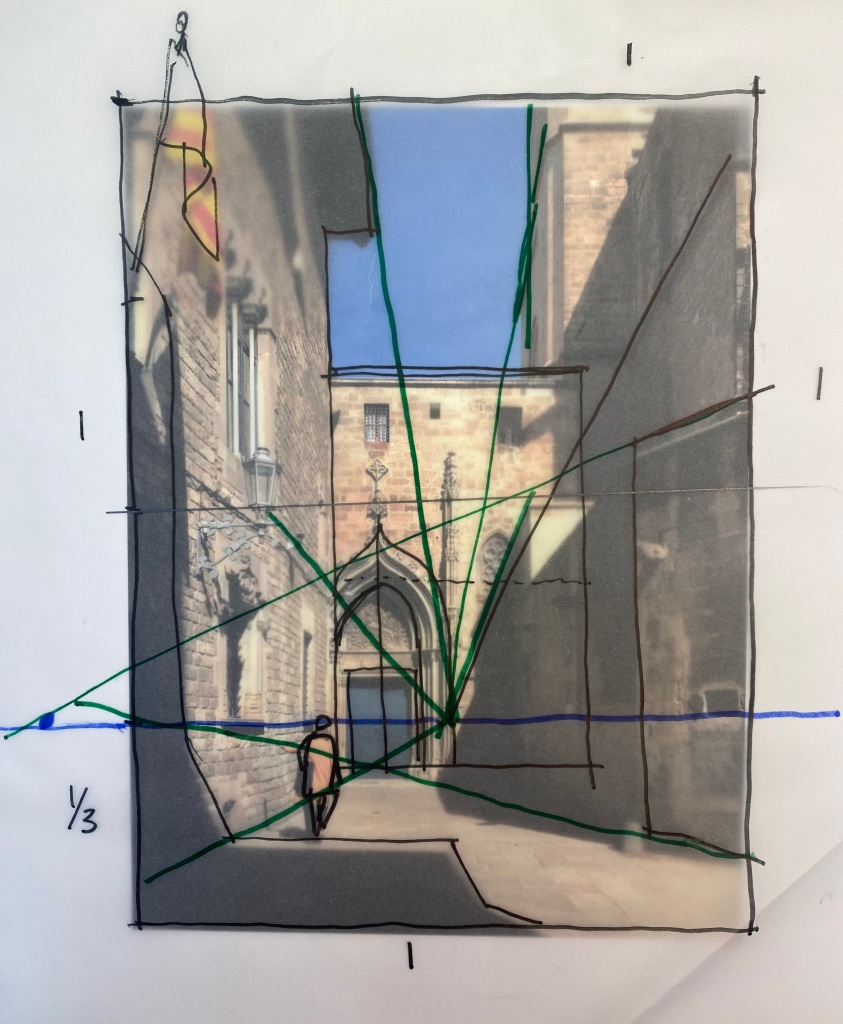
I’m pretty bad about keeping up a daily practice of just about anything…diet, exercise, sketching, blogs–you get the idea. But during these dark days of a Seattle winter, I realized that my sketching skills were getting a bit rusty. To keep the gears oiled, I decided to work from photos in a sketchbook in my studio. It’s been good practice, and I’ve been posting the sketches on IG and FB, but in so doing, I noticed that there is a big difference between the studio sketches and the ones I do on location. Here is a perfect example.
The sketch above was done on location one sunny morning sitting in a corner on the backside of the Catedral in Barcelona in 2019. Yes, I can feel the heat, remember the sounds of the people walking by…all those details that are magically infused into a live, on location sketch.
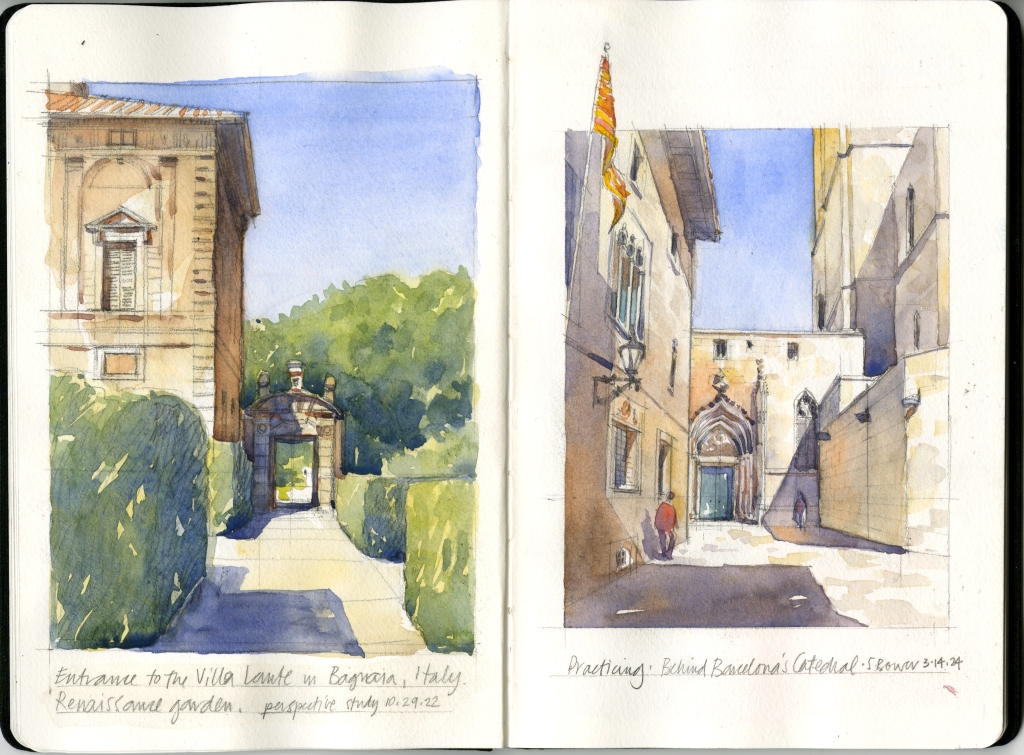
The sketch below on the right is the same scene, done a few days ago in my studio in Seattle from a photo that I took. A big difference that I didn’t realize until well after it was done. Why so different?
In many ways, working in the comfort of a warm and dry studio is easier than battling the elements, the truck that blocks your view and all the things we urban sketchers deal with when working out in the world. I think that’s why my studio image, while I like it a lot, is calmer, has more subtle watercolor washes, etc. But it also lacks the energy, contrast, and I don’t know what else that the on-site sketch has–that energy infused into a sketch is a bit part of why I love being an urban sketcher. It’s less about making pretty art and more about capturing the experience. But studio work is great to do too, and pretty art is wonderful…and it’s certainly good practice for me. We are always working on improving what we do, right?
And if you are curious, that is an Escoda sketchbook (approx. 5″ x 8″) that was given to me and small group when we visited the Escoda factory a few years ago. The paper buckles a bit under the wet washes, but it does take the color and pencil work nicely. I hope to fill this book with small studio sketches!
Anyone who has ever done one of my workshops knows that I love teaching how to analyze the proportions and perspective in any view I sketch (does anyone else do this?), so I had to include the analysis for this one. 🙂
GOOD BONES | SAN ANTONIO TX | an Urban Sketching Workshop| April 13-14, 2024
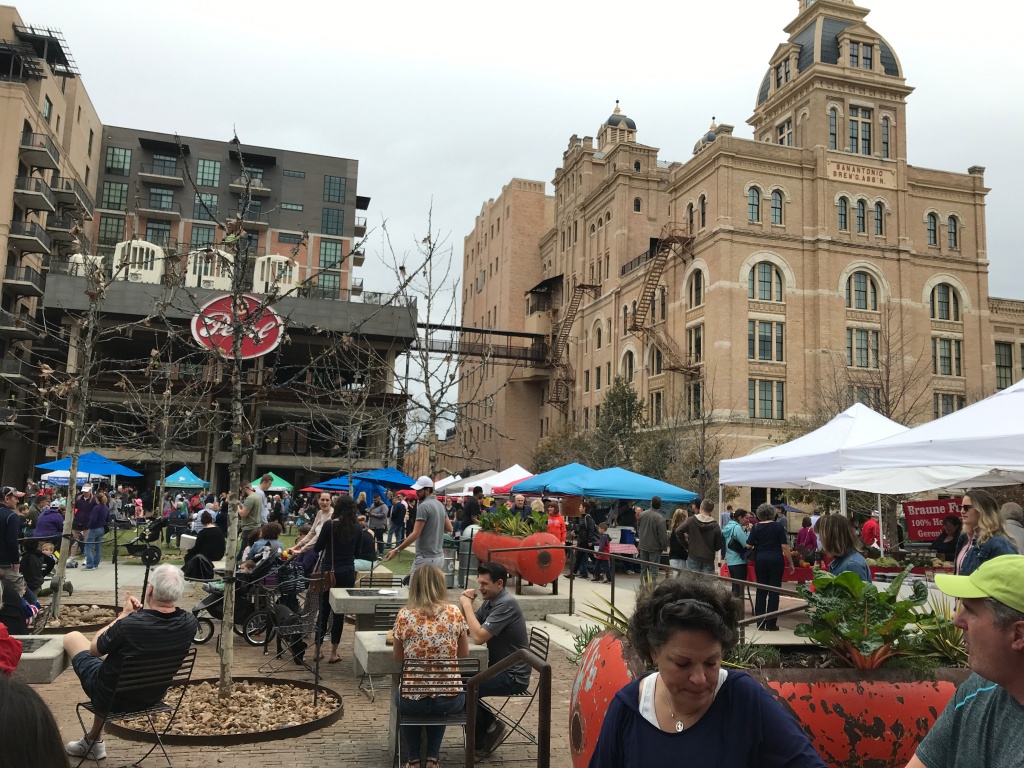
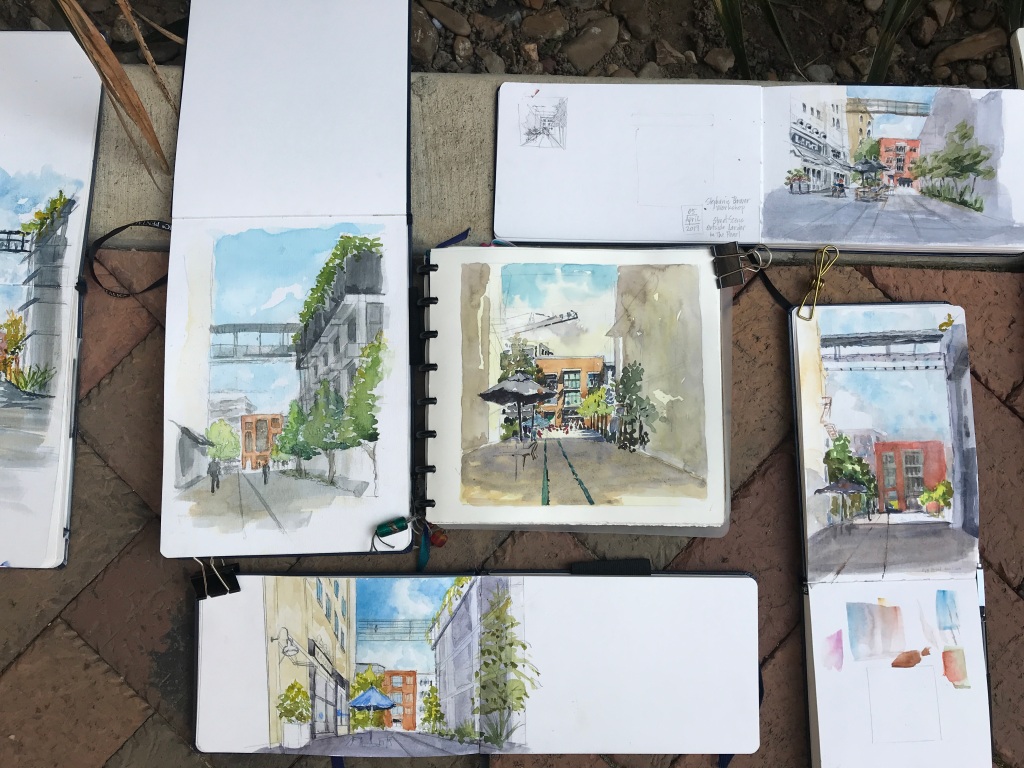
I always say that good sketches start with Good Bones! In this workshop, you’ll learn the simple steps to set up the foundations of a great architectural sketch in perspective and watercolor. How do you start a location sketch? Where is the darn Vanishing Point? Watercolor is too overwhelming! Held in the beautiful and vibrant historic THE PEARL, an award-winning urban development along the famous San Antonio Riverwalk, this workshop offers 1.5 days of instruction in perspective and watercolor location sketching.
Day 1 | FULL DAY | Saturday, April 13 | 9am – 5pm* | Meet in front of Cure by 8:45am
Morning: Introduction to basic watercolor tools and techniques, using a simple palette of colors. Shade/Shadow.
Afternoon: Learn perspective basics and a simple step-by-step process to construct an architectural perspective sketch, how to build the sketch in layers and add architectural watercolor.
* One hour break for lunch.
Day 2 | HALF DAY | Sunday, April 14 | 9am – 1pm| More perspective and watercolor to cement the concepts.
GOOD BONES | SAN ANTONIO is open to 15participants with any level of experience, but it’s targeted to sketchers who want to improve their basic sketching and understanding of perspective and watercolor. We will focus on how to sketch buildings and urban spaces, and The Pearl is the perfect setting!
Workshop Registration opens Friday, February 9 at 12noon CST (San Antonio) (NOTE: as a thank you for following this blog, you have early access to register starting Thursday, February 8 at 12noon CST (San Antonio)
To sign up, contact Stephanie by email at stephaniebower.workshops@gmail.com. The first 15 emails will be accepted—first come, first served. A waiting list will be created in case spots open up.
Workshop fee is $225.00payable by Zelle or check once you are notified via email of a confirmed spot in the workshop. Instructions will be sent to all registered participants.
Cancellation In the unforeseen event the workshop is cancelled, all fees will be reimbursed. If you have to cancel your participation, please contact the instructor by email ASAP. If you cancel after March 15, 0% of workshop fee is reimbursed. A materials supply list and additional information will be emailed to registered participants.
I hope you can join me! Lots to sketch, great setting, great food, great fun!
Dates are set, the new sessions are about to start! Registration opens promptly on Wednesday, January 6 at 10am Seattle time.
UNDERSTANDING PERSPECTIVE | LIVE online masterclasses in perspective sketching made easy with Stephanie Bower
Do you fear or fake perspective sketching?
Can’t figure out how to start a perspective sketch?
And where is that darn vanishing point anyway?
Understanding Perspective is a LIVE online course that makes perspective sketching easy! I’m Urban Sketcher, workshop instructor, architectural illustrator, and author Stephanie Bower, and I’m excited to offer this course to anyone wanting to finally understand how perspective works. Perspective is easy when you know what to look for!
This course is a live, interactive 6-part online class taught via Zoom in which you’ll learn by drawing along with me in real time. In each class, we’ll take notes and sketch together as I present perspective concepts in a crafted PowerPoint presentation, then we will apply those concepts in a step-by-step sketching demo that we will draw and paint together. Yes, you’ll learn lots about watercolor technique too! And like an in-person workshop, you’ll see me work up close, and I’ll answer your questions LIVE.
Understanding Perspective
Class 1: Creating a Road Map to Follow
The foundations of a perspective sketch in 3 simple steps
Demo
Class 2: Perspective Fundamentals
One and two point perspectives—what’s the difference?
View Angles and View Eye Levels
Demo
Class 3: The Importance of Foreshortening
Foreshortening
Thumbnails
Demo
Class 4: Multiple Vanishing Points
Streets, Roofs, Stairs
Demo
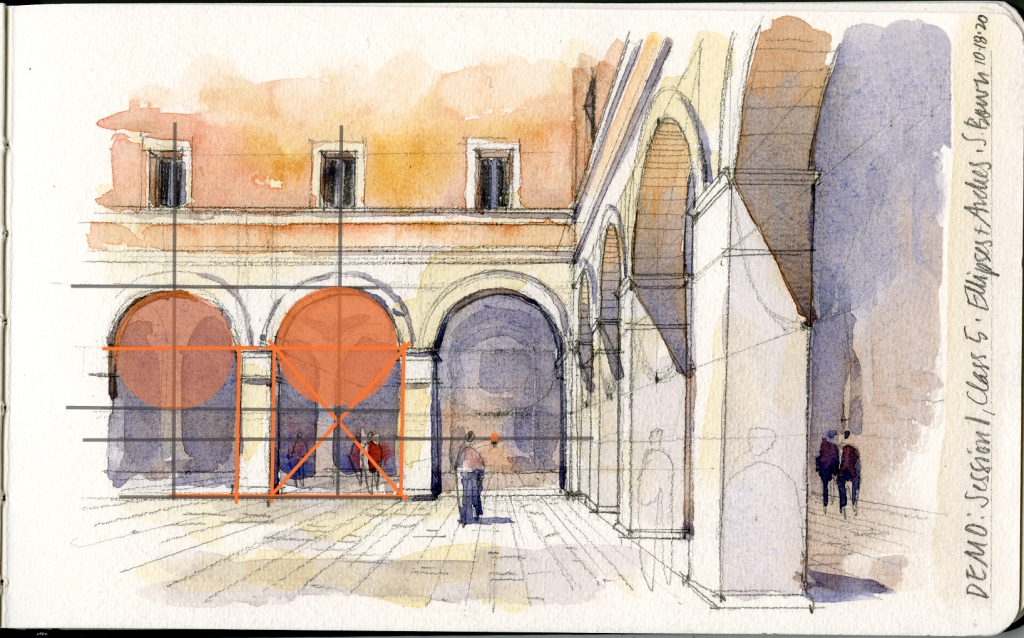
Class 5: Circles in Perspective
Ellipses
Arches (they are not like horseshoes!)
Demo
Class 6: Looking UP
Towers are like wedding cakes
Domes are round
Demo
++++++++++ WORKSHOP FEE
Understanding Perspective:Classes 1-6, Workshop fee is US$325.00
Included are 6 classes + Tech Check/Intro to Materials, crits during the classes, personalized crits and markups via email on the optional homework assignments, and access to view the class recordings. I’ll send you Notes before each class, and after class, I’ll send scans of the completed demo for your reference.
Workshop fees are payable by check or Zelle for US participants or by PayPal for international participants. Info will be sent to all registered participants.
++++++++++ DATES AND TIMES
Session 1: Sundays at 9am Seattle time (12noon New York, 6pm Paris) for 6 weeks. January 17, 24, 31, February 7, 14, 21
Session 2: Tuesdays at 4pm Seattle time (7pm New York; 11am Wednesdays in Sydney, Australia) for 6 weeks. January 19, 26, February 2, 9, 16, 23. Note: this class content is particularly targeted to beginning sketchers. If you are new to sketching, please sign up for this session.
Each class is expected to run about 3-3.5 hours (It goes by very quickly.)
Classes will be limited in size.
++++++++++ HOW TO REGISTER
Registration opens promptly on Wednesday, January 6 at 10am Seattle time. Email Stephanie at stephaniebower.workshops@gmail.com at that time, and be sure to indicate which sessionyou’d like, Sundays or Tuesdays (beginners).
++++++++++ QUESTIONS?
During this class, will you be sitting outside on location or are we working from photos?
Sadly due to the pandemic, we cannot sketch together live on location just yet. This will be the next best thing as you join me in my tiny studio and we work from carefully selected photos with the understanding that ultimately, the course is about location sketching. In some ways, you’ll see the demos BETTER than when done in person, as Zoom will allow you to look at my sketches up close.
What do you mean by an “interactive PowerPoint”?
I’ve created these classes to mirror a real college course. Most of the information is delivered through detailed PowerPoint presentations that I’ve developed. I’ll pause throughout the presentation so that you can draw and take notes, and I will sketch along with you as well. After the PowerPoint and a short break, we’ll apply the concepts learned to an actual live demo. I’ll draw and paint a scene step-by-step so that you can also draw and paint with me at the same time. And before each class, I’ll email participants a worksheet that they can print out and use for notetaking or simply to help them follow along.
I’m new to sketching, is this class OK for me?
YES, I love teaching beginners! If you are new to perspective, or simply want to improve your knowledge and skills, this class is for you. The Tuesday afternoon session is particularly targeted to new and beginning sketchers.
I’m already a pretty good sketcher, will I learn anything new from this class?
YES! Even seasoned sketchers will benefit from seeing this approach and for the deep and detailed dives into architectural elements like multiple vanishing points, ellipses, and domes. I’ll also show lots of shortcuts to sketching complex subjects in simple ways.
Will there be homework?
Yes, but homework is optional. I’ll provide a few images at the end of each class that you can work on at home and at your own pace. I’ve created a private Facebook group where you can share your sketches and homework with others in the courses.
I don’t have a computer or tablet, can I still take this class from my phone?
You will need a computer or laptop to do this course. A phone or tablet will not work.
What art supplies will I need for this class?
You’ll need your basic sketching equipment, including watercolors. I’ll email participants a list of supplies.
What equipment do I need for this class?
Use the largest screen and best wifi connection available to you! You will also want the newest equipment possible with the best camera so that we can see your work well.
You will need to have the free online download ZOOM downloaded onto your computer (ideal) or laptop. Instructions on how to join the live class will be emailed to all registered participants each week.
**Note: We will be using the side-by-side feature for viewing on Zoom. That way, you can see both the PowerPoint and my sketches at the same time. That’s why you will need as large a screen as possible!
Tech and Materials Check
I’ll schedule a Tech Check on Zoom the Saturday before classes start so that everyone knows how to access Zoom’s “side-by-side” viewing mode. I’ll also go over the art materials we’ll use in the class and talk , including how to mix my “Magic Gray”.
How does this course compare with your Craftsy classes and books?
The biggest difference between this class and Craftsy and my books is that this is LIVE instruction! You can ask questions and I’ll answer in the moment. Most of this content is brand new, and doing the live demo together at the end of each class will cement the concepts you are learning.
Will this class be recorded to show again at a later date in case we cannot participate in the live classes?
Yes, recordings will be available for viewing (not downloading) after each class. These have proven to be extremely helpful for participants who prefer to work slowly or who have to miss a class.
Will you be offering more classes in the future?
Definitely! I intend to keep offering Understanding Perspective. If you have suggestions for days and times that might work better, please let me know. The plan is to also add new courses, such as sketching interiors. So stay tuned!
Thanks so much for your interest in this course! I hope to see you on Zoom!
I hope to see you soon on Zoom! And Happy New Year!!
Sorry for the lapse in posts, but I’ve been focusing on creating an online course I hope to offer LIVE via Zoom in a few weeks! It will be a masterclass on perspective sketching made easy (any suggestions for a title??) that is based on an interactive lecture I gave 5 years ago at the USk symposium in Singapore. As I buy more and more equipment to pull this off, my little home office is slowly being converted to a TV studio!
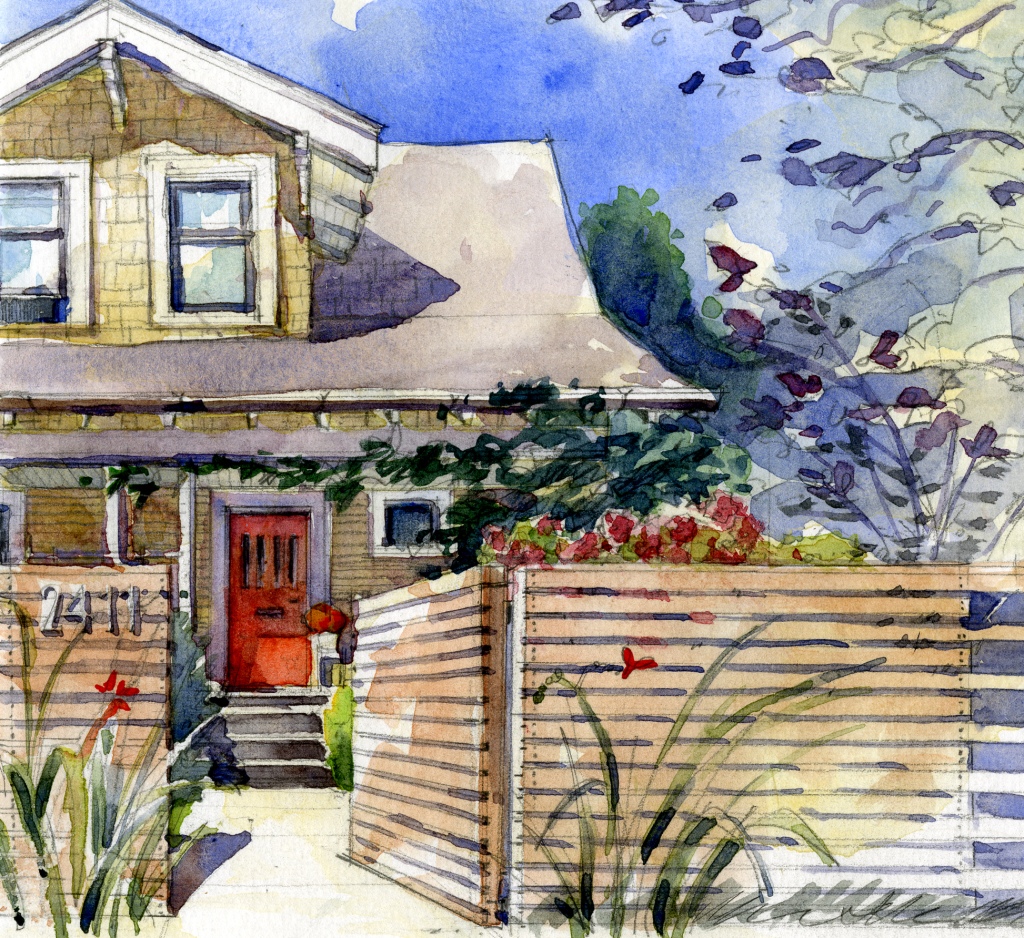
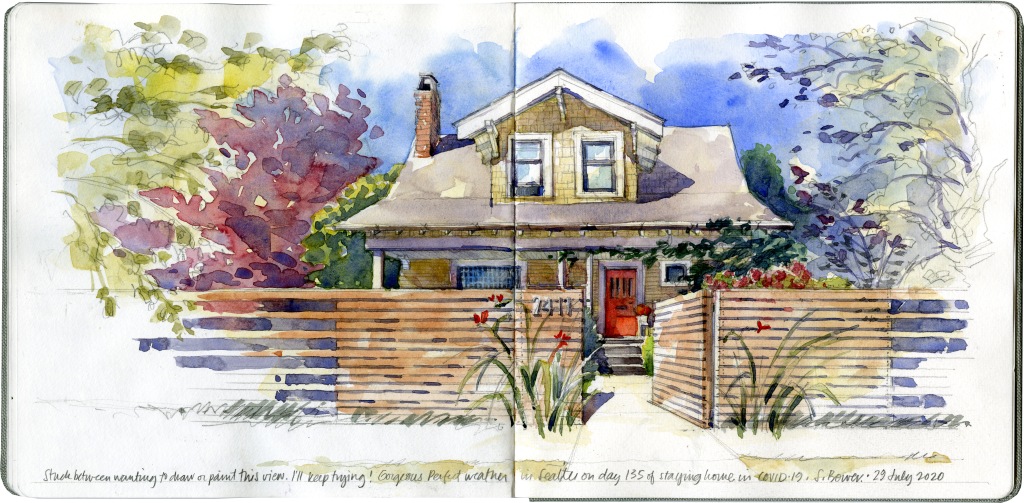
Today I sat in front of my house to sketch, as I don’t feel compelled to go too far from home these days. I also haven’t sketched in a while, and I’m feeling the rusty joints. The drawing part I pretty much have down, it’s the painting where you can often see that I’m out of practice–when I’m not warmed up, I tend to overpaint.
This is the front of our 1911 Craftsman house in Seattle. I realized about 3/4 the way through that I’m currently stuck somewhere between making it a drawing or a painting. I typically like the architectural feel of the drawings with minimal color, so I’m going to blame my attempts to be more painterly on none other than Shari Blaukopf. I look at her beautiful work and I think I need to use more color. Ha! Don’t we all wish we could paint like Shari?
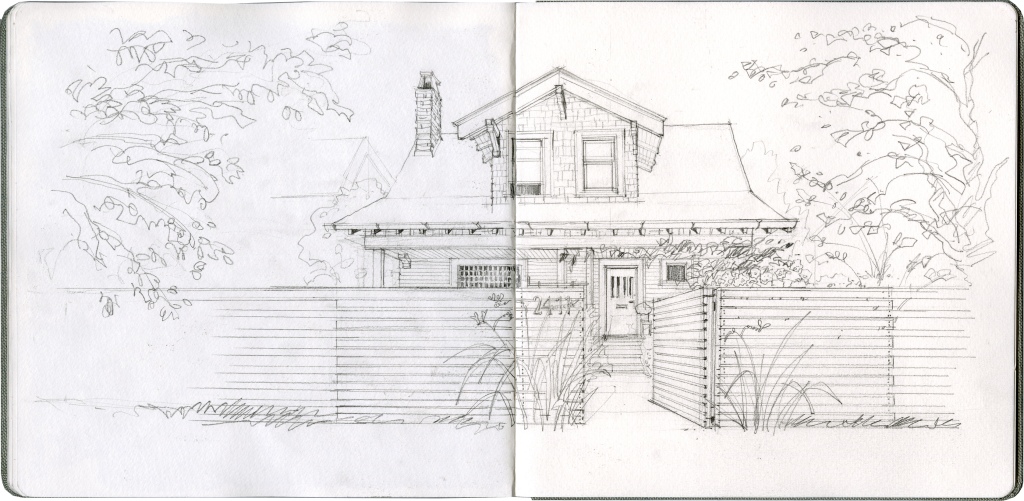
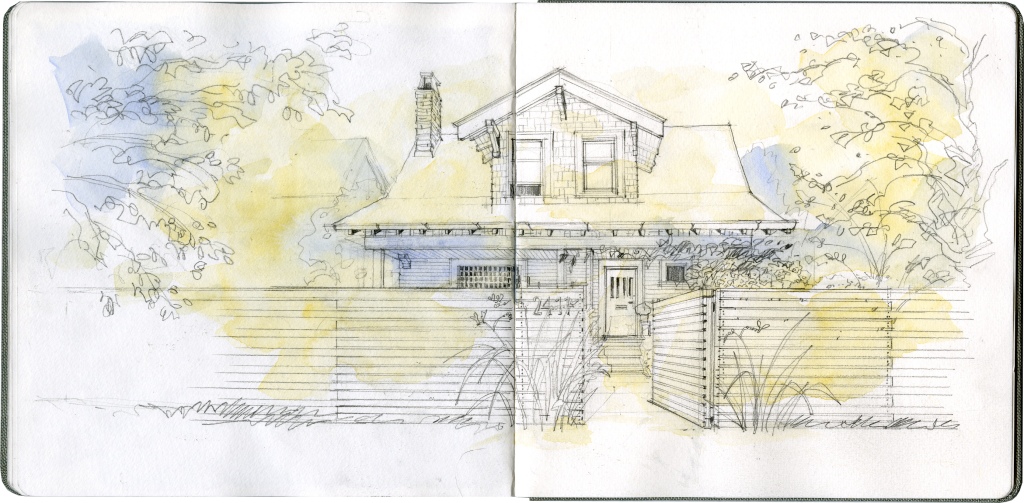
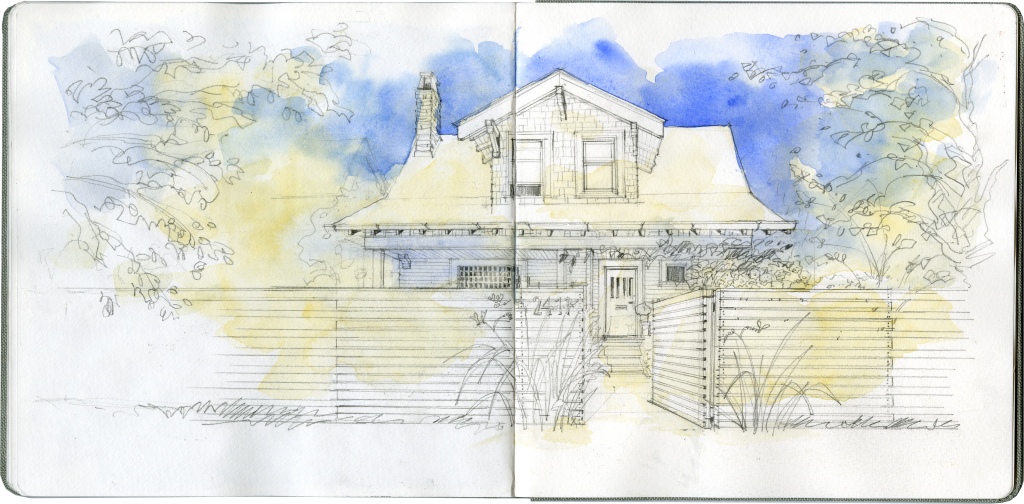
Here is a bit of the process for today. One advantage of sketching at home is that I can run into the house and scan the progress images! Below is the finished line, the underpainting of warms and cools, the addition of the sky dropped into wet paper, and the final sketch.
I actually love the image with the sky, as I’m always a little sad once I cover up my line work! It has a balance that I rather like. I also like how the fence came out. The house itself, well I’m still working on getting those darn values right…